Deutsch
 Français
 Русский
 Español


U49 Wildergarde
Welcome to @KaiRosenthal's RP/Solo Stamina Warden-Templar-Nightblade Build titled "Wildergarde"!
Thank you for taking an interest in my build! I really wanted a refresh of my Khajiit Warden's build, as the one I used was... fine, but lacking in damage and have a boring gameplay (personal opinion) (spoiler: it was a one bar build). So, after days of tinkering around, trying to find the combinations that I feel suit for my character, I made this build!
My character is a Warden first, which is why I use nearly all of the Animal Companions skills. He's also a devout to the Aedra, which is why I want to incorporate a skill line from Templar. I settled with just Warden and Templar at first, but the damage was severely lacking. So, I added Nightblade's Assassination to boost our damage.
One more thing before we proceed, this build has some low duration DoT skills and will require you to constantly go back and forth from the front bar to back bar, on top of spamming the spammable skill, which can be overwhelming for some players. However, if you're interested or are actually into high APM builds, this might just be for you!
Now, without further ado, here's my guide on Wildergarde!
Pros and Cons
Pros:
- Fairly easy to sustain, needs occasional potions for easier fights.
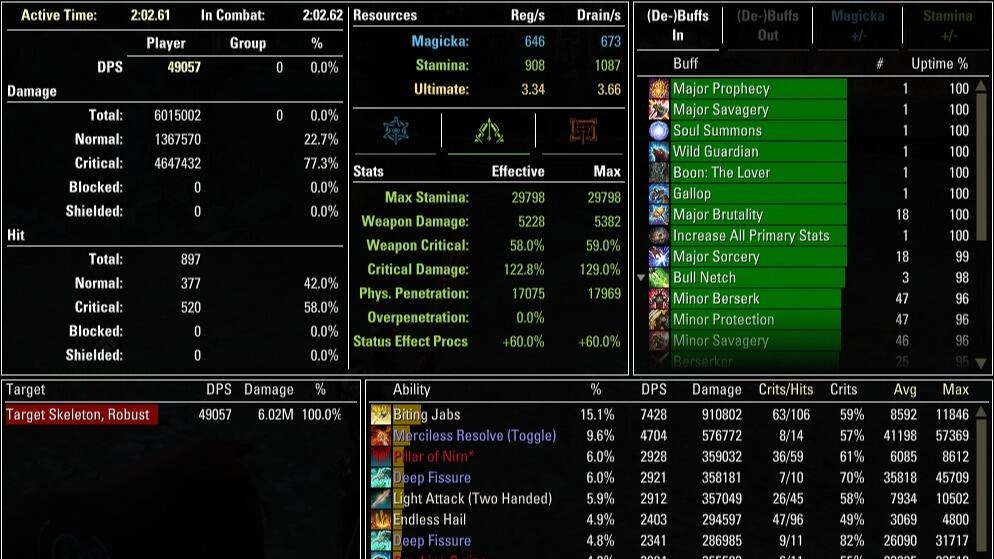
- DPS is relatively high (by my standards), sitting at 47.2k DPS.
- Bear pet.
Cons:
- Rotation is relatively high APM, because of the skills used having low duration.
- Build dependent on
 Ring of the Pale Order mythic. No issues in dungeons though, just swap it out.
Gears
> Why 1/6/0 instead of 1/5/1 or 0/7/0?
We want as much damage as possible, and medium armor's passives accommodates that. I also use one light armor piece just so we reach a 100% penetration cap for instanced content, boosting our damage without overcapping on penetration, nor invest too little in penetration when we do solo arenas.
> Why ![]() Pillar of Nirn and
Pillar of Nirn and ![]() Order's Wrath?
Order's Wrath?
![]() Pillar of Nirn and
Pillar of Nirn and ![]() Order's Wrath are the best set that boosts our damage, and thematically appropriate.
Order's Wrath are the best set that boosts our damage, and thematically appropriate. ![]() Pillar of Nirn is a dungeon set from Falkreath Hold, while
Pillar of Nirn is a dungeon set from Falkreath Hold, while ![]() Order's Wrath is craftable from High Isle which is very easy to obtain.
Order's Wrath is craftable from High Isle which is very easy to obtain.
Some alternatives that I recommend are ![]() Briarheart and/or
Briarheart and/or ![]() Hunding's Rage to replace either set.
Hunding's Rage to replace either set. ![]() Briarheart is now accessible for everyone from Wrothgar's overland in Orsinium DLC, while
Briarheart is now accessible for everyone from Wrothgar's overland in Orsinium DLC, while ![]() Hunding's Rage can be crafted from base game stations.
Hunding's Rage can be crafted from base game stations.
For the back bar bow or staff, you can absolutely go with ![]() Thunderous Volley or
Thunderous Volley or ![]() Perfected Thunderous Volley, or
Perfected Thunderous Volley, or ![]() Crushing Wall or
Crushing Wall or ![]() Perfected Crushing Wall. I personally haven't got them unlocked, so putting another
Perfected Crushing Wall. I personally haven't got them unlocked, so putting another ![]() Order's Wrath will do.
Order's Wrath will do.
> Why ![]() Slimecraw?
Slimecraw?
One piece of Slimecraw gives us more critical chance, which will increase our damage output. You don't have to use ![]() Slimecraw, though; any other set that gives critical chance for its first piece will work just fine (i.e.
Slimecraw, though; any other set that gives critical chance for its first piece will work just fine (i.e. ![]() Iceheart and
Iceheart and ![]() Zaan), but
Zaan), but ![]() Slimecraw is by far the easiest to obtain for me.
Slimecraw is by far the easiest to obtain for me.
> Why ![]() Ring of the Pale Order?
Ring of the Pale Order?
Didn't you read the tooltip? 20% of our damage dealt heals us! That's a big help for our survivability. If you want to queue for a dungeon, please swap it out with other mythic ring, anything will do, except Oakensoul, obviously.
Skills
Here are my skill selections, their brief explanations, as well as which slot I put them:
Front Bar
 Merciless Resolve: Major Savagery, Major Prophecy, a big damage and it heals us. Use
  Relentless Focus if you use the staff setup.
 Biting Jabs: This is our spammable that gives Major Brutality and Major Sorcery, which also procs
  Spear Wall passive, granting Minor Berserk and Minor Protection.
 Deep Fissure: Major Breach and Minor Breach. Good damage as well. Leave it running for 3+6 seconds before reactivating.
 Carve: DoT that you can stack thrice for up to 31 seconds that gives you shield each strike. Don't be afraid to play it safe and spam this until you can heal up if you're under pressure, as this skill is both damage and survivability in one package.
 Deceptive Predator: Slotted for Minor Evasion. You can activate it to run faster! We use this morph because the other one gives Minor Berserk, which is already covered in our Spear Wall passive.
 Wild Guardian: Rawr.
Back Bar
 Blazing Spear: AoE DoT.
 Endless Hail: Also AoE DoT, but less shiny. Use
  Unstable Wall of Elements if you're using staff.
 Growing Swarm: Also AoE DoT, but insects. Gives Minor Vulnerability too.
 Barbed Trap: Single target DoT that gives Minor Force.
 Bull Netch: Major Brutality, Major Sorcery, stamina sustain, and cleanse.
- Wild Guardian: RAWRRR.
Rotation
I will assume that you can and will do light attack weaving, so that I don't have to write it down below.
- Start with your back bar: Bull Netch > Barbed Trap > Growing Swarm > Endless Hail or Unstable Wall of Elements > Blazing Spear
- Swap to front bar: Deep Fissure > Carve 3x > Merciless Resolve or Relentless Focus > Biting Jabs
- You can now spam Biting Jabs. Use Merciless Resolve or Relentless Focus as how I stated above, keep Carve from resetting, and refresh your other DoTs.
- Rinse and repeat!
Additional Information
You've made it this far, congratulations! Here are some more reading for you, for more bits of extra knowledge:
- Most of the time, I only use
 Orzorga's Tripe Trifle Pocket or the Crown Fortifying Meal as I have lots of them, and also the normal mob drop Essence of Stamina, or Crown Tri-Restoration Potions (I have 3900 of them sitting in my bank). If you are doing harder contents, please refer to the Consumables section where you can pick and choose which one you need more!
 - We use the Lover mundus for all instanced solo content to increase our penetration. As I state above, this build can reach the 100% penetration cap for instanced contents. Use the Thief instead if you just want to run around in the overland or doing dungeons with the homies.
- Noticed I recommended Strategic Reserve in the CP section? You can sacrifice damage for more health regen by not using your bear skill.
Thank you!
I'm actually very proud with this build, even though I know it may not be the best. It's so thematically fitting for my character! If you have any questions or suggestions, feel free to let me know at @KaiRosenthal in-game.
See you around, and go cleanse Nirn from those daedra!