Discord Bot
 ESO Server Status
 AlcastHQ
 First Descendant





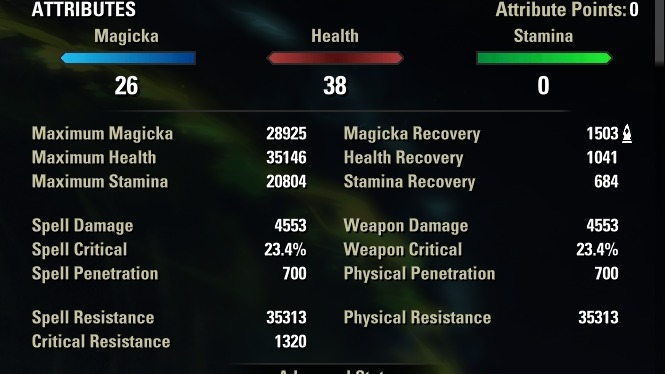
STATS: Remember, a dead healer can't heal!
This build should be at at least 35k Health and as close to 30k Magicka as you can make it.
Divines on most of your gear is to help you increase your magicka recovery, you'll need every bit of help you can get just to keep casting your skills. Infused pieces help to increase your raw stats by increasing what your enchantment offers. Reinforced on very specific pieces will help increase your armor.
Spell damage enchantments on the jewelry also help to increase the potency of your heals, Infused traits to make them stronger.
The Mundus stone is The Atronach to help increase your magicka recovery.
GEAR:
 Foolkiller's Ward - This set makes you a bit harder to kill, giving you and your teammates a damage shield when you block (once every 30 seconds under most situations.) It is important for a healer to be tanky in PVP, so Foolkiller's being Heavy Armor in addition to its set bonuses is fantastic.
 Blind Path Induction - This 5-piece will increase the potency of your damage shields most of the time, rather than the healing skills. Though, it is useful to still be able to increase your healing at a distance.
 Mender's Ward - This staff's effect is one of our two sources of Major Vitality. lt's ability only affects the individual who your
  Ward Ally is granted to, but the increase to damage shields is needed due to Battle Spirit.
 Ozezan the Inferno - This is majorly for the Minor Vitality buff granted to allies, also really helpful to boost your weakened damage shields due to Battle Spirit.
-------------------
SKILLS:
FRONT BAR
[Warding Contingency] - Damage shield, HoT effect, and your source of Major Sorcery for more Spell Damage. Make sure you are near allies when casting, the delayed burst is an AOE around you.
[Healing Soul] - Large heal, HoT effect, and your second source of Major Vitality. The major buff only affects the ally targeted by the heal, but it goes a long way to help offset the Battle Spirit effect in pvp.
 Chakram of Destiny - The main spammable Damage Shield that gets stronger if you can stack them. Each activation generates a crux, and for each crux you have you increases your healing by 4% because of
  Healing Tides. Try to keep three crux up at all times.
 Heart of Flame - This skill is a self-heal and also restores 15% of your magicka and stamina each cast. This is one of your most important skills used to maintain your resources.
 Beckoning Armor - This grants both Major Resolve and Minor Resolve. Additionally, if someone hits you from a distance, having this skill active will pull the attacker into where you are standing. This is helpful for your teammates who are likely attempting to pick off the enemies that are attacking you by grouping the enemies up at your location.
ULTIMATE
 Replenishing Barrier - A strong damage shield ultimate for you and your allies, your go-to ultimate if it is readily available. The busting of these shields will restore magicka to you as well, a helpful effect in a pinch.
BACK BAR
Ward Ally - A large burst shield that affects the lowest health ally and yourself at the same time. This skill procs your Mender's Ward staff effect to grant yourself and the target Major Vitality.
 Cauterize - A hot that heals up to 6 people. While it's slotted you passively have Major Prophecy.
 Reconstructive Domain - Minor Courage, Minor Intellect, Minor Endurance, and less importantly Minor Fortitude is all granted by the aoe circle this skill leaves on the ground. It's also a hot for those standing within.
 Hearth and Home - An aoe hot that also grants Minor Heroism, and less importantly Minor Fortitude, to those healed. While inside the aoe, you gain Major Protection as well, and enemies inside are slowed by a whopping 70%.
 Radiating Regeneration - A 'sticky HoT' that stays ticking on an ally as you move around the map and even potentially out of range of a player. This is helpful to keep up the Ozezan the Inferno Minor Vitality buff.
ULTIMATE
 Life Giver - Your main and most powerful healing skill, this ability casts three skills at the same time for free! (That is, Radiating Regeneration,
  Combat Prayer, and Ward Ally. Be sure to learn and morph
  Blessing of Protection despite not using it in the build so this ultimate can use its morphed ability.) Since this ultimate casts Ward Ally, it also will proc the Mender's Ward to grant Major Vitality to the target. This skill never fails to save someone from peril if used in time, and if Replenishing Barrier is not available, the low cost of this skill is a fantastic secondary choice.
-------------------
Additional Comments:
Consumables
 Bewitched Sugar Skulls are my current go-to for the stat increases.
[Essence of Immovability] doesn't restore any magicka but the stamina and the Major Endurance it grants is invaluable when you are being teamed up on. The biggest reason to use this potion, however, is because of the Unstoppable that is grants, immunity to knockback and disabling effects. If you see enemies approaching, it is helpful to use a potion just as they are about to arrive to nullify any initial debuffs they would place on you while you are focusing on your allies. The Major Expedition is also potentially a life-saving buff to help you reposition, or traverse the terrain.
Passive Honorable Mentions
Healing Tides pairs with Chakram of Destiny to increase your total healing by 12% as long as you have three crux active.
 Intricate Runeforms is an amazing passive that will increase the strength of your damage shields and reduce the cost. This works when casting Chakram of Destiny, [Warding Contingency], and Ward Ally.
 Essence Drain from the Restoration Staff tree grants Major Mending when you complete a fully-charged heavy attack. Weave Heavy attacks into your casting to maintain this important buff.
 Cycle of Life from the Restoration Staff skill line allows for greater magicka recovery from heavy attacks using your back-bar Restoration staff.