Deutsch
 Français
 Русский
 Español


Hello everyone! I've been playing ESO on and off since release. I enjoy theory crafting builds and trying different concepts. You should know that there are probably much better builds out there but for me this keeps the content from feeling to stale. For all my builds, I like to take a few concepts and center the entire build around them.
EG Arcanist Tank Healer v1.
Mission:
Tank and heal for the group in VDLC content as an Arcanist.
Intro:
For this build I centered around making an Arcanist that can tank and also keep the group alive. This is my current project and I am still in the process of experimenting, so some things may trade off eventually but I believe I have it to a point that it can be published as version 1. If you like the idea of using a tank healer with 3 DPS, I also built a Dragon Knight Tank Healer that will be published shortly. This build is strictly PVE.
The main obstacle in creating builds like this is how thin it spreads you. There just isn't enough resources to go around and trying to evenly distribute those resources ends up forcing you to make concessions in other areas. It also requires you to play two roles and everything that comes along with that. Generally tanks focus on being tanks, debuffing the bosses and crowd control. While healers focus on healing, team buffs, and secondary damage. Tanks try to focus the boss away from their team while healers tend to stand behind their DPS.
Even with all the obstacles there is some overlap in the two roles. The purpose of having a tank and healer is to keep everyone alive. My goal was to focus in on sets, abilities, and champion skills that bolster the overlap where it makes sense. Doing both roles, even with an optimized build, is much more hectic, but I feel it is also much more fun.
The Mechanics-
Champion Points:
This build doesn't really have enemy debuffs or team damage buffs. My thought process is that can be sacrificed for the third DPS. The champion points are a good reference to get a quick peek on how this build works. It's focused on buffing the damage shields, magicka, healing, and block mitigation and cost reduction.
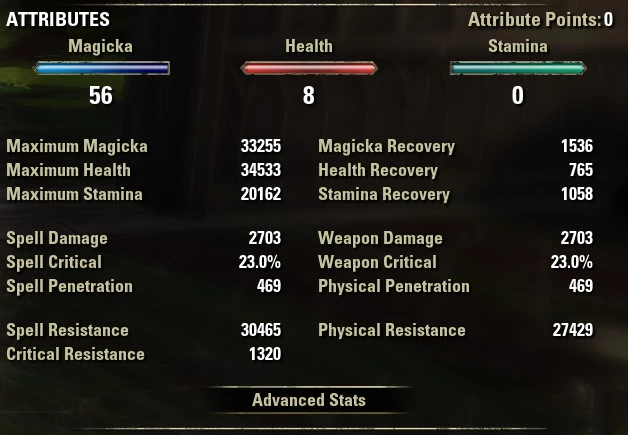
Attribute Points
Magicka: 56.
Health: 8.
Stamina: 0.
Glyphs
Health on the armor/shields. Bracing on the jewelry. Hardening on the weapons.
Weapons:
This build uses sword and board on both bars. There maybe room to alternate between a sword and board and resto staff but I haven't tested it yet. Without the resto staff your healing power does take a hit but I feel that constantly switching back and forth leaves you vulnerable to hard hitting opponents. This way you are always prepared to block, allowing you some room to make mistakes.
On the one handed weapons you will notice I opted for Powered. When I made the decision to ignore enemy debuffs, it seemed to make sense to increase the healing done. Without the resto staff every little bit helps.
The shields, as with all the armor pieces, I went with sturdy. I thought about reinforced armor and that still might be a good option but I needed ways to mitigate stamina costs wherever possible. I didn't go heavy into stamina. Most of the abilities don't use stamina but the taunt and blocking alone eat away at your resource pool. Sturdy seems to help a lot but this maybe something I look to improve on for version 2.
Jewelry
For the jewelry stats I went with Infused and Bracing. Anything to help reduce the cost of blocking and save on the stamina resource seemed to make sense.
Armor:
The main overlap between tank and healer with this build that I focused on were the damage shields. I feel that this type of build could work on multiple classes as well.
Brands of Imperium. A set that gives flat health, healing taken, an automatic damage shield that is applied to your group and buffed by the champion points seemed to make sense. Its automatic, it doesn't cost you any resources, the cool down is fairly short, and its buffed by your champion points. It being automatic has its drawbacks. It may give a shield out when your team doesn't necessarily need it and be on cool down when they do need it. However I feel that it tends to work out. It can only be procd when you take damage, therefore it usually procs for the group when damage is being done. Plus 12 seconds isn't very long, and you can mitigate the down time with your other abilities.
Lamias Song. Resource management for yourself and your group is where you will find yourself spreading thin. You are the tank and healer in this build so group resource management is a part of your concern. Where I find trouble is that the two don't always line up. You needing resources and your group needing resources may happen at different times. Lamias Song helps with this issue. Coupled with the barrier ultimate from the support tree, this set turns your ultimate into a panic button. If you are low on resources or health or one of your team members are low on resources or health popping the Barrier ult will proc the Lamias Song bonus giving everyone health, stamina, and magicka back. It still works out if you need it but your group doesn't or vice versa. When the time comes that either you or someone in your group needs this ult, everyone benefits in one way or another.
Swarm Mother. Brands of Imperium only comes in heavy and Lamias Song only comes in light. To utilize both of those sets, Brands of Imperium had to be the main armor set while Lamias Song had to be the jewelry and weapons. This unfortunately means that the monster set had to be medium and light. So you will lose some armor on the medium head piece. For Swarm Mother, the flat magicka and stamina the 1 piece bonus gives you is nice but the automatic enemy pulling proc and taunt seemed like a good combination with this build. Being able to compensate the stamina usage from the Arcanist taunt by adding the set piece taunt helps with resource management. I think with this build the monster set is versatile and other sets can be swapped out. I happen to have both pieces of this set in sturdy, and the proc effects felt useful.
Abilities:
This build has a very simple front and back bar. I tried to keep the rotation as simple as possible because you have to pay much more attention to your DPS health bars.
Defensive Stance, Inner Light, Runic Sunder, and Replenishing Barrier are all double barred because they give passive bonuses.
Defensive Stance is double barred because it gives you a block cost reduction by 10% and damage blocking increase by 10%. It also gives you a stamina based damage shield if you need it. I've noticed that you tend not to need this damage shield but its there if you do and gets buffs from the champion points.
Inner Light is double barred because it gives you an increase to your max magicka. It also utilizes the Magicka controller passive from the Mages guild that gives you additional max magicka and magicka recovery.
Runic Sunder is your main taunt. I subbed out the sword and board taunt for this one because it applies minor maim, gives you armor, generates crux, and while crux is active and this is slotted reduces damage taken by 2% per crux active. Plus this taunt is ranged. The ranged taunt helps a lot. It allows you to keep the main bosses static and still taunt enemies chasing your DPS.
Replenishing Barrier is double barred because it receives a bonus from the support alliance war passive Magicka Aid which gives 10% magicka recovery. I always felt this ultimate was underrated. Both morphs are good. The damage shield lasts 30 seconds and starts out at around 40k. Each ward that expires gives you 4 ultimate and 1000 magicka back. Plus the support passive just for having it slotted. Originally I tried the Arcanist damage shield ultimate but I felt this was more useful to the group.
Cruxweaver Armor was a hard decision to make. The other morph gives 5% additional blocking plus an additional 5% if crux is consumed. As an arcanist tank though, I realized that you don't generate crux as easily and when you did finally have some crux up I would have to choose between the armor ability and Tidal Chakram. This build needs crux to come up frequently. Without it the build will be reduced to three forms of healing, Reconstructive Domain, Runegaurd of Freedom and the proc from Lamias Song when you ult. Cruxweaver Armor mixed with your taunt generates crux effectively and allows for the usage of Tidal Chakram as a main heal giving you 4 heals.
Tidal Chakram is your main targeted heal and damage shield. The mechanic of this ability also works well because it auto targets your group members as long as they are in front of you. When you are tanking the boss away from your group all your group members should be facing you so this works out well. Coupled with the champion point bonuses, the higher magicka and recovery, plus the crux effect this becomes a fairly strong damage shield and heal. Its not a super strong heal, but it is effective and spam able.
Reconstructive Domain is your main AOE heal. What's great about the Arcanist class is you get a decent amount of group buffs that last a long time. This ability applies, Minor Courage, Minor Fortitude, Minor Intellect and Minor Endurance to you and your group for standing in the AOE for 20 seconds. The draw back is the 8 meter radius. It maybe difficult to get those back line DPS group members and yourself inside the circle.
Runegaurd of Freedom gives you minor protection, minor resolve and a decent self heal. Plus Minor Resolve applies to your group giving them additional tanking stats as well. The great part about this ability is that the heal will proc on its own when you need it.
Ability Rotation:
The rotation on this build is very simple and luckily the Arcanist buffs and AOEs last a long time. This is good because it gives you time to focus on taunting and providing damage shields and heals to your team mates.
I like to start with Cruxweaver Armor, swap bars drop Reconstructive Domain, and Runegaurd of Freedom. You put all three of these down/on quickly. Then I like to swap back and stay on this bar. Using Runic Sunder to taunt, and Tidal Charam whenever I think my team needs damage shields or the Crux version to heal them. You will generate Crux frequently so you can spam Tidal Chakram. The constant damage shields will give you time to drop block and weave some heavy attacks if necessary. If you feel your resources getting overwhelmed I like to pop the Tristat potion.
Your main buffs and AOEs last around 30 seconds so you don't have to pop them that often which gives you time to focus on taunting, and shielding/healing your team mates. If I'm in a tight spot and can't get all three buffs on, I prioritize Cruxweaver Armor. Giving you Major Resolve and applying Minor Breach to the enemies automatically is very useful to this build. The armor stats are kind of lacking but Cruxweaver gives you a big boost plus you need the crux to boost your main damage shield.
When you or one of your teammates is in serious danger then you ult. The Replenishing Barrier with Lamias Song basically gives everyone a complete refresh plus a 40k+ damage shield. This can bring your group back from the brink or give everyone a resource refresh to carry them over a DPS check. The damage shield on top of all of this may seem like overkill, especially with Brands of Imperium going off on its own, but its not. I've noticed that the damage shield gives everyone a second to catch their breath and regroup. It also gives everyone time to understand why they almost died and what mechanic requires attention. A massive damage shield is great for this because it follows them while they are in panic mode without sacrificing any healing that was done.