


This is a pretty simple build with a minimal rotation, but it is high casts per minute. I'm not sure how well it would do without light attack weaving, which I do even with Velothi-Ur equipped. Despite the races selected, any race is fine; I'm on a Wood Elf myself.
Equipment
- Velothi-Ur Mage's Amulet is used. If you can't get that, try using Selene's monster set. I haven't done this myself, but it's probably the best substitute. In that case, the best thing you can do is to use a piece of Null Arca jewelry to maintain the 5pc set bonus.
- If you're not using Velothi-Ur you'll need to source Minor Force from another place. The most common way this is done is by running Trap from the Fighter's Guild skill line, either morph is fine. You can swap Liquid Lightning out for this.
- I use Null Arca and Tide-born Wildstalker. Because Null Arca is a trial set, you can use Order's Wrath in place of Null Arca until you get the set. Pillar of Nirn might be a good substitute as well.
- The Maelstrom Arena Greatsword (or any 2H Maelstrom weapon in a pinch) is also used for this build. This gives a 7~12% direct damage buff. This build is very direct damage heavy so it's an excellent buff. I can't really recommend a substitute here, you really need to get this, but until you do, you might as well use Tide-born Wildstalker.
Skills
Liquid Lightning acts as a flex slot. It was chosen to provide another synergy option to the group. You can replace it with something else if you prefer--I know some people don't like ground target abilities. I've used Carve from the Two Handed skill line in the past. As mentioned previously, you can also run Barbed Trap, which removes the need for Velothi-Ur and lets you use a monster set or another mythic instead.
I do NOT recommend Banner here because it will give you sustain issues and this is supposed to be an easy build. If you still want to give it a shot, drop Bound Armaments and Liquid Lightning for it. You'll want to set it up with Shock, Cavalier's Charge, and Savagery and Prophecy.
A more in-depth talk about Banner and its options follows here so feel free to skip this paragraph. Shock is chosen because the build is very direct damage heavy. Cavalier's Mastery is chosen because Hurricane provides Minor Expedition--this adds up to 90 extra weapon and spell damage as long as it's active. Savagery and Prophecy is an excellent buff that you lose by removing Bound Armaments, so we want it here. If you really want to stack buffs, you could use Heroism in place of Savagery and Prophecy, but that will require you to use Major Savagery Potions on cooldown to maintain the crit rating buff. I can't really recommend this because this build is meant to be easy, but it's an option.
Boss Rotation
I usually start a fight on my backbar. 3>4>5 before pulling (Hurricane, Twilight Tormentor, Volatile Familiar). Engage with 1 (Stampede) and drop 2 (Liquid Lightning). Hit the Conduit synergy when/if you can. At this point, switch to frontbar and 2 (Daedric Prey), then spam 1 (Biting Jabs) to your heart's content. When your ult is up, drop Charged Atronach unless you think the boss is about to move.
Trash Rotation
Keep Hurricane up at all times. If you can manage it, keep your pet buffs active but only cast them between pulls. Engage with Stampede, drop Liquid Lightning and then spam Biting Jabs until Stampede/Liquid Lightning/Hurricane drop.
Further Rotation Tips:
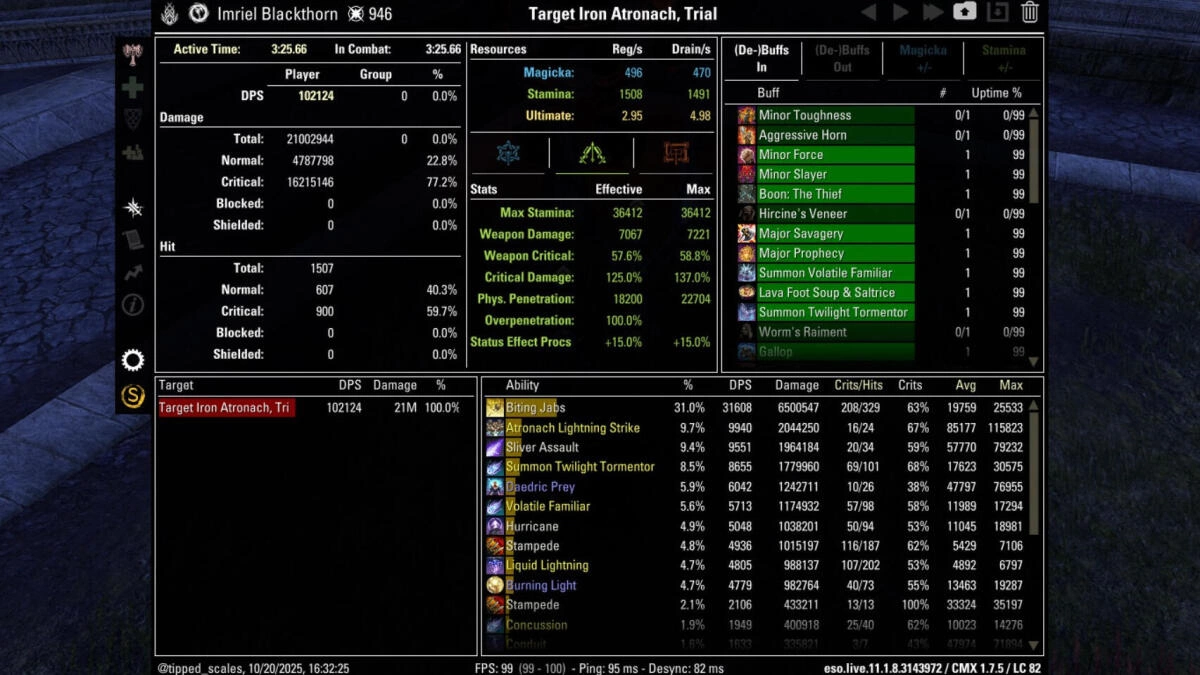
- Keep Daedric Prey going at all times. Yes, all times! I know it's annoying to recast something every 6 seconds, but your pets will target the mob with Daedric Prey and do 50% more damage to them. Keep this up on the boss. If done correctly, your pets and your Daedric Prey together amount to ~22% of your damage.
- The one exception to the Daedric Prey rule: you do NOT have to cast Daedric Prey during trash pulls unless one mob is particularly tanky. Casting it will only slow you down in trash.
- Life Pro Tip: You don't need to keep the pet buffs active at all times. Only cast them on engaging a fight or during down time. Trying to keep them up at all times is actually a DPS loss according to my tests, and Twilight Tormentor's buff only has any effect when the mob is over 50% health anyway.
- When you place Liquid Lightning, you should always try to use the Conduit synergy. You can do this yourself, and it does a large chunk of damage when it goes off. If you have the relevant Undaunted passives, it'll also restore some of your stamina.
- You may have noticed I didn't mention when to use Bound Armaments. The answer is never. It's there for the Major Prophecy & Savagery buff only.
- You may wonder why Flawless Dawnbreaker is on the frontbar. It's for a damage buff. With the Fighter's Guild passive Slayer fully maxed out, you get 3% extra damage for having it on your bar, which will buff your Biting Jabs damage.
- For soloing overland content, I usually swap out Hurricane for Critical Surge. This provides huge self-healing as long as you keep doing damage. Alternatively, you can use a Vigor morph for a heal over time.
- If you need a self-heal in combat due to some mechanic, it's best to use Vigor (either morph). Swap out either Liquid Lightning or Hurricane, whichever you prefer.