La mayor parte del contenido de la versión en español de ESO-Hub ha sido traducido mediante aprendizaje automático. Si quieres ayudar a mejorar las traducciones, ponte en contacto con nosotros en nuestro servidor Discord.

Static DK - Dragonknight Construye PvE - ESO

This is a Semi Static Rotation for a Mag DK, The Back Bar is interchangeable with the Maelstrom Inferno Staff or Greatsword. Keep DoTs on Frontbar up and apply backbar together.

By TheDeadJester   •  Updated hace 1 mes

Sets de armadura

Todos los conjuntos de armadura equipados
Habilidades activas equipadas
Todas las estrellas activas y pasivas

Personaje

Todo sobre la configuración del personaje

Opciones de carrera

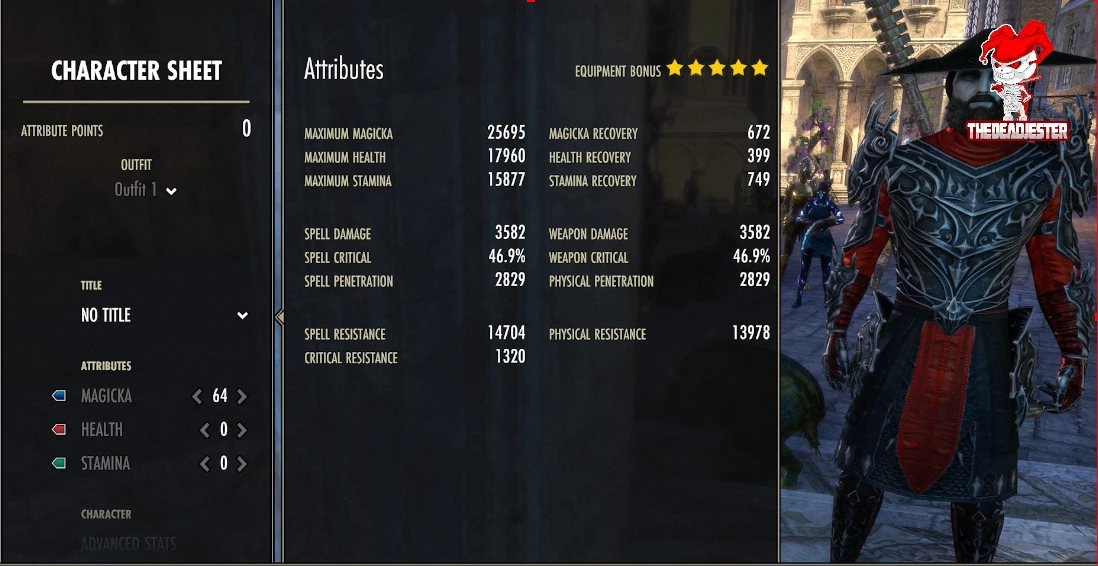
Atributos

  • Icon icon
    Magia
    64
  • Icon icon
    Salud
    0
  • Icon icon
    Aguante
    0

Piedra Mundus, Maldición

Alimentos, bebidas y pociones
Icon icon brocheta de araña crujiente
Artrópodos
Baya De Asaí (1)
Cebo De Agua Sucia (1)
Especias (1)
Huevo De Araña (1)
Icon icon pescado en escabeche de Arteum
Arroz (3)
Hiel De Almeja (3)
Miel (3)
Pescado (5)
Icon icon
Poción de trirrestauración de coronas
Todas las habilidades pasivas

Atajos y debilidades

Mejoras otorgadas por habilidades, objetos y pociones
Empower icon
Empower
Increases the damage of your Heavy Attacks by 70%.
Gallop icon
Gallop
Increases Mounted Speed by 15%
Major Brutality icon
Major Brutality
Increases Weapon Damage by 20%
Major Defile icon
Major Defile
Reduces Healing Received and Health Recovery by 16%
Major Evasion icon
Major Evasion
Reduces damage taken from Area of Effect attacks by 20%
Major Prophecy icon
Major Prophecy
Increases Spell Critical chance by 12%
Major Savagery icon
Major Savagery
Increases Weapon Critical by 12%
Major Sorcery icon
Major Sorcery
Increases Spell Damage by 20%
Minor Berserk icon
Minor Berserk
Increases all damage done by 5%
Minor Brutality icon
Minor Brutality
Increases Weapon Damage by 10%
Minor Force icon
Minor Force
Increases Critical Damage by 10%
Minor Slayer icon
Minor Slayer
Increases damage dealt in Dungeons and Trials by 5%

Capturas de pantalla

Capturas de pantalla de TheDeadJester
  1. 123
    123
1 / 1

Guía

Explicación de la construcción
Esta guía está escrita en Inglés.

The build is based on a Backbar being applied together with the Maelstrom Greatsword or with Maelstrom Inferno every 10 seconds


Inferno Staff - Wall of Elements

With the inferno Staff all Back Bar Dots are placed at the beginning with the Standard

After 10 Seconds Reapply the Wall of Elements

Keep Dots on Front Bar up while whipping in between

When Wall falls off after 10 Seconds go to back bar and reapply ALL 4 of the backbar dots regardless of their timing

Keep Dots on Front Bar up while whipping in between

When Wall falls off after 10 seconds reapply Wall only

Keep Dots on Front Bar up while whipping in between

When Wall falls off after 10 Seconds go to back bar and reapply ALL 4 of the backbar dots regardless of their timing


Place standard any time you go to the Backbar to apply wall or dots when up


Rinse and Repeat 100K-115K should be the outcome. 


Greatsword - Stampede

Same as above, but when Stampede runs off just reapply all backbar dots each time regardless of timer

Vídeo

TheDeadJester

TheDeadJester

Actualizado hace 1 mes