English
 Français
 Русский
 Español


- U50 Rampaging Slayer
- Pros and Cons
- Gears
- Skill Selections
- Night Market Version
- Rotation
- Additional Information
- Thank you!
U50 Rampaging Slayer
Welcome to @KaiRosenthal's RP/Solo Stamina Dragonknight Build titled "Rampaging Slayer"!
Thank you for taking an interest in my build! Last year, I was planning on making a subclass build variant for my DK but after I got back to the game and run some tests, the rework for Dragonknight made me want to try out pure class first, and so this is the build I came up with.
This is my attempt on making a solo build using weapons, skills, and armors that I like but also make sense for my character, while also making him able to survive on his own. Contained in this guide section, you'll find what and how my reasoning and justification for the build, and also some alternatives that I hope is easy and simple enough to follow along.
Pros and Cons
Pros:
- Very easy to sustain, to the point of not needing potions in easier fights.
- Easy rotation thanks to the skill selections that has long duration.
- Features a pure class build that will get stronger in U50.
Cons:
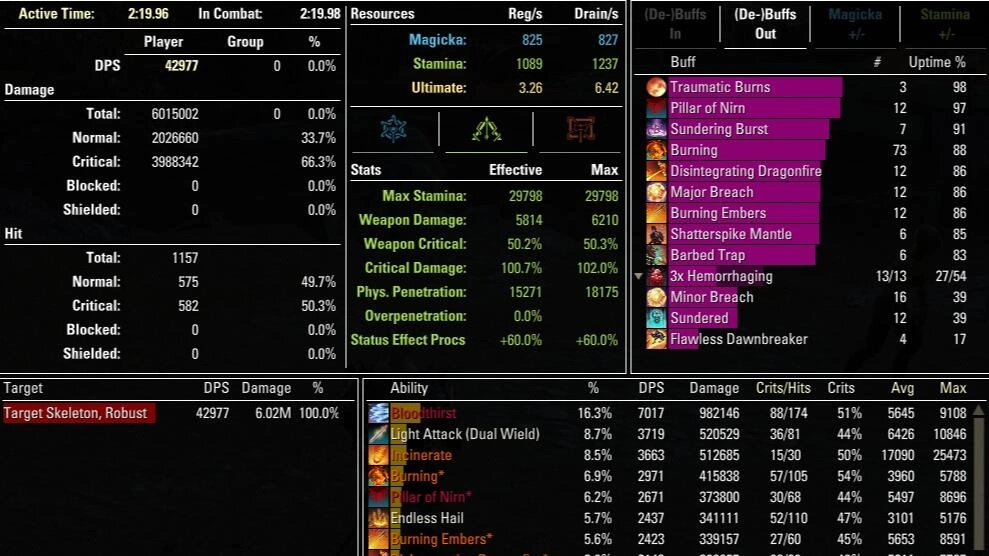
- DPS is a bit on the lower side (43k DPS).
- Build dependent on
 Ring of the Pale Order mythic. Must be swapped out when doing group content.
Gears
> Why 1/6/0 instead of 1/5/1 or 0/7/0?
We want as much damage as possible, and medium armor's passives accommodates that. I also use one light armor piece just so we reach a 84%-100% penetration cap for instanced content, boosting our damage without overcapping on penetration, nor invest too little in penetration when we do solo arenas.
> Why ![]() Pillar of Nirn and
Pillar of Nirn and ![]() Order's Wrath?
Order's Wrath?
![]() Pillar of Nirn is simply just an awesome set to have for its damage, doubly so as it gives a fitting attack visually for this build's theme. As for
Pillar of Nirn is simply just an awesome set to have for its damage, doubly so as it gives a fitting attack visually for this build's theme. As for ![]() Order's Wrath, it's the best set that boosts our damage, which is very easy to obtain as it's a crafted set.
Order's Wrath, it's the best set that boosts our damage, which is very easy to obtain as it's a crafted set.
If you want to use other sets, I recommend ![]() Briarheart and/or
Briarheart and/or ![]() Hunding's Rage to replace either set. With Orsinium DLC now available, everyone can get
Hunding's Rage to replace either set. With Orsinium DLC now available, everyone can get ![]() Briarheart from Wrothgar's overland, while
Briarheart from Wrothgar's overland, while ![]() Hunding's Rage can be crafted from base game stations.
Hunding's Rage can be crafted from base game stations.
For the back bar bow, you can absolutely go with ![]() Thunderous Volley or
Thunderous Volley or ![]() Perfected Thunderous Volley. I personally haven't got them unlocked, so putting another
Perfected Thunderous Volley. I personally haven't got them unlocked, so putting another ![]() Order's Wrath works just fine.
Order's Wrath works just fine.
> Why ![]() Slimecraw?
Slimecraw?
One piece of Slimecraw gives us more critical chance, which will increase our damage output. You don't have to use ![]() Slimecraw, though; any other set that gives critical chance for its first piece will work just fine (i.e.
Slimecraw, though; any other set that gives critical chance for its first piece will work just fine (i.e. ![]() Iceheart and
Iceheart and ![]() Zaan), but
Zaan), but ![]() Slimecraw is by far the easiest to obtain for me.
Slimecraw is by far the easiest to obtain for me.
> Why ![]() Ring of the Pale Order?
Ring of the Pale Order?
This mythic ring gives us huge survivability by allowing our damages to also heal us. However, you should keep a backup mythic ring that is not Oakensoul (duh) whenever you need to do group content. Like, literally anything works btw, especially if it's just a normal random dungeon run. Or just slap a random ring you found if you don't have any other mythic rings.
Skill Selections
Here are my skill selections, their brief effect and use, as well as which slots they occupy:
Front Bar
 Soul Burst: AoE DoT that gives Minor Intellect and Minor Endurance. Occasionally will give Sundered because of it being a physical damage, hence the aforementioned 84%-100% penetration cap. You can change the affix to provide Minor Breach instead if you want to hit the 100% cap all the time. Alternatively, you can just slot
  Deadly Cloak even though it gives Major Evasion instead. You choose.
 Bloodthirst: The spammable skill that heals us with each strike.
 Disintegrating Dragonfire: AoE DoT and Major Breach.
 Burning Embers: DoT but also HoT that uses magicka, which is good for our sustain and survivability.
 Heart of Flame: AoE, heal, and gives you stamina and magicka. This skill is packed.
 Flawless Dawnbreaker: A bar buffer that we can use on enemies. Highly recommend to use off-cooldown instead of the other one below for its low(er) cost for frequent use. Restores resources via our [Battle Roar] passive.
Back Bar
 Shatterspike Mantle: Major Resolve and DoT. If you need more survivability, you can use
  Earthshield Mantle instead, which gives shield instead of DoT.
 Barbed Trap: Mainly used as a DoT that also gives Minor Force.
 Endless Hail: Good ol' AoE DoT.
  Incinerate: AoE DoT that gives Major Savagery and Major Prophecy.
 Igneous Weapons: Major Brutality and Major Sorcery. We use this morph because the other morph requires constant application, which drains our already small pool of magicka. Not a fan of it changing my weapons' looks, though.
 Standard of Might: An ultimate that buffs you by increasing damage dealt, reducing your damage taken, and debuffs enemies by increasing their damage taken. Restores resources via our [Battle Roar] passive.
Night Market Version
The build's Night Market version focuses on making this build survivable against one to two packs of mobs at a time, and is intended to be used for solo roaming to do the quests scattered in the zones.
Here are the skills that got slotted in and/or repurposed:
- Disintegrating Dragonfire: This is now our spammable, as it has a big cone AoE to hit multiple enemies at once.
- Deadly Cloak: An AoE DoT that grants Major Evasion, perfect for NM's enemies that has lots of AoE attacks.
 Take Flight: Replacing Flawless Dawnbreaker because it lifts/stuns enemies.
 Resolving Vigor: Must be kept up all the time for the Minor Resolve.
Rotation
I will assume that you can and will do light attack weaving, so that I don't have to write it down below. Since the build is mostly comprised of DoTs, we want to basically apply all of our DoT attacks and then spam ![]() Bloodthirst. Don't forget to reapply DoTs as they run out!
Bloodthirst. Don't forget to reapply DoTs as they run out!
- Start with your back bar: Igneous Weapons > Endless Hail > Incinerate > Shatterspike Mantle > Barbed Trap
- Swap to front bar: Disintegrating Dragonfire > Burning Embers > Soul Burst > Heart of Flame > Bloodthirst
- You can now spam Bloodthirst, but remember, you need to refresh all of the DoTs above when they ticked off.
- Use Heart of Flame when you feel like you need magicka and/or stamina; a general rule of thumb for me is if either reaches half, use the skill.
- Use your ultimate skills to both do damage and sustain yourself! As I stated above, I recommend to stick with Flawless Dawnbreaker for its cheap ult and quick resource regen, even if Standard of Might is generally better in terms of damage.
- Rinse and repeat!
Here are the rotation for the Night Market version:
- Start with your back bar: Igneous Weapons > Endless Hail > Incinerate > Resolving Vigor > Shatterspike Mantle
- Swap to front bar: Deadly Cloak > Burning Embers > Soul Burst > Heart of Flame > Disintegrating Dragonfire
- You can now spam Disintegrating Dragonfire, but remember, you need to refresh all of the DoTs above when they ticked off.
- Use Heart of Flame to keep your stamina topped up. You'll need them to break stun, block, and dodge attacks.
- Use whichever ultimate you deem best suit for the situation: Take Flight for stun, Standard of Might for damage and mitigation.
Additional Information
You've made it this far, congratulations! Here are some more reading for you, for more bits of extra knowledge:
- Most of the time, I only use
 Orzorga's Tripe Trifle Pocket or the Crown Fortifying Meal as I have lots of them, and also the normal mob drop Essence of Stamina, or Crown Tri-Restoration Potions (I have 3900 of them sitting in my bank). If you are doing harder contents, please refer to the Consumables section where you can pick and choose which one you need more!
 - We use the Lover mundus for all instanced solo content to increase our penetration. As I state above, this build can reach the 84%-100% penetration cap for instanced contents. Use the Thief instead if you just run around in the overland or doing dungeons with the homies.
Thank you!
I hope you'll enjoy the build as much as I do. If you have any questions or suggestions, feel free to let me know at @KaiRosenthal in-game.
See you around, and burn down your foes!