The Wounding is accessible by the blue portal in the Choosing entrance area. This area is inspired by Molag Bal and his realm of Oblivion, Coldharbour. You will encounter many of Molag Bal's minions: Xivkyn, Harvesters, Ogrims… If you have a weapon with a Glyph of Prismatic Onslaught with you, use it here!
The first enemies you will encounter here are several Banekin and Winged Twilights. These are skippable, the only mob that needs to die is the Harvester who’s guarding the glowing door to the next part of the way. Kill it and move forward.
Up next are a few more Banekin, Winged Twilights and two Ogrims.
If you have done the Hunter’s Grotto (=green area) before, you can nowtake a little detourto grab the Magicka buff. For this buff, don’t continue across the wooden bridge, but instead run towards the south(left). You will see two Banekin and a grappling area. Cross the two chasms with the Grappling Hook to find the Essence of Mysticism. Collecting this will spawn additional Mysticism Remnants at random points throughout the Wounding. After collecting the buff, make your way back towards the wooden bridge.
Continue across the wooden bridge. Avoid the moving little shock orbs on the ground, they cause surprisingly high damage. Get rid of the Dire Warden, another Harvester, to open the gate to the first boss of the Wounding.
Boss 1 - Zakuryn the Sculptor & Flesh Abomination

Boss Health: [HP: 659'583 & 989'092 / 791'500 & 1'207'297 / 1'121'291 & 1'710'338]
Zakuryn is a Xivkyn Necromancer. Immediately after starting the fight he will summon a giant Flesh Abomination.
Zakuryn’s most dangerous attack is the Daedric Swell, he lifts his staff up into the air and channels skulls to fly towards you. This channeling attack can be interrupted.
The Flesh Abomination’s most dangerous attack is “Pulverize”, a giant heavy smash with his fist. This is indicated by a glowing, electric AoE. Get out of this or you will get oneshot.
This can’t be blocked or shielded.
Zakuryn’s Shield
A little while into the fight, Zakuryn will put a shield around himself and become invulnerable. He will not lose this shield until you either remove it or kill the Flesh Abomination. To break his shield, pull the Flesh Abomination to where Zakuryn is standing and wait for the big, glowing AoE that indicates the Abomination’s Pulverize smash. If Zakuryn gets hit by this, his shield will be broken.
Banekin Portal
Zakuryn
will open a portal through which several Banekin will spawn into the
arena. They are nice for sustain via ![]() Consuming Trap or armor sets. The
Banekin can also be killed with the Flesh Abomination's Pulverize
smash.
Consuming Trap or armor sets. The
Banekin can also be killed with the Flesh Abomination's Pulverize
smash.
Enrage / Killing one of them early
If you kill one of the bosses before the other one, the surviving boss will heal for half of its starting health and become enraged, dealing significantly more damage. To avoid this, damage both of them equally to make sure they die at the same time.
Example Boss Fight VideoIf you want to watch the whole boss fight you can watch the video here.
After the Boss (Portals) / Way to the next bossDefeating Zakuryn unlocks the Wounding Portal mechanic. After using a Wounding portal, you have 20 seconds to make your way forward. If you don’t fulfill the objective (pulling a chain or lever for example) or refresh the timer back to 20 seconds by synergizing an Amplify Sigil, you will get ported back and have to start over again. If you want to kill all mobs for score, you will probably not be able to do that without being ported back at least once.
You won’t be able to use a Wounding Portal again after you completed your task inside.
Use the first Portal that now appeared on the ground next to Aydolan. In the corridor you find yourself in now, you will encounter a few Banekin and two Watchers. An Amplify Sigil can be found halfway. The mobs are skippable. Your objective here is to pull the chain at the end of the corridor, this will port you back to where you used the portal and fix the magic bridge to the west.
Head across the bridge and through the metal gate to encounter a few Banekins, a Winged Twilight, a Xivkyn Hammerfist and a Xivkyn Chillfiend. Notice the eye-like enemy hovering mid-air here? That is a new type of enemy. Those things are Sentinels, if they see you they put a debuff on you. To get rid of that debuff, you can either run away from them, out of their gaze, or kill it.
Kill the Ogrim Behemoth and use the next Wounding Portal. In there you can opt to kill the Banekins, a Xivkyn Kinlurker, a Sentinel and a Harvester, or simply pull the chain at the end to get ported back.
Cross the newly formed bridge. After the bridge going to the left will bring you to the second boss, but you have to finish the portal first by going straight after the bridge. If you are going to the right side, that is where the optional boss "Xobutar Of His Deep Graces" is located.
Inside the portal, either fight the Banekins, the Sentinel and the Xivkyn Hammerfist, or just run up to the chain at the end and pull it. This will form the bridge to the final boss of this area.
Boss 2 - Iozuzzunth

Boss Health: [HP: 2'515'203 / 3'018'244 / 4'275'845]
Iozuzzunth is a Daedric Titan and the final boss of the Wounding. His fight is pretty straightforward and does not have complicated mechanics.
Iozzuzunth
This Titan will keep standing in the middle of the room. Fighting him at range is a lot easier than on melee, as his melee attack deals a lot of damage. His most dangerous attacks are the melee swing he does with his claws, and a fast-moving wave of coldfire on the ground.
Sentinels
From time to time, a Sentinel will spawn, and if it sees you, it will place a debuff on you. The easiest way to deal with them is to stand directly in front or directly behind them so that Iozzuzunth hits them with his coldfire ground-wave. That takes away the majority of their health and it takes only a few additional hits from you to get rid of the Sentinel. The debuffs they can place on you are a big hindrance so make sure the sentinel dies as fast as possible. You can encounter four different types of them in this fight:
- Sentinel of Vulnerability: You take more damage
- Sentinel of Enfeeblement: You deal less damage
- Sentinel of Dissipation: Your health gets drained
- Sentinel of Debilitation: You are slowed down
Watchers / Portal
On the stone ring above, Watchers will appear and they will deal damage by firing laser beams at you. To get rid of them, you can use the Wounding portal near the entrance. This will teleport you onto the ringshaped space above. After porting up you have 20 seconds to kill as many watchers as you can, after this time you will be automatically ported back down. Be careful, when you get close to a Watcher it will charge an AoE attack that knocks you back and possibly off the ring. Once you get down again, you will have to wait for about half a minute for the Wounding portal to activate again. During this time, more Watchers will have spawned.
If your damage is very good, you can try to ignore the Watchers completely and just keep moving while damaging Iozzuzunth and the Sentinels, as it is not mandatory to kill any of them. Just make sure to get rid of a few if the damage really gets too intense. If you struggle with resources during the fight, you can port up and kill a few Watchers after placing “Consuming Trap” on them or to proc your False God/Vicious Serpent sets.
Example Boss Fight Video
If you want to watch the whole boss fight you can watch the video here.
After The Boss
Upon Iozzuzunth’s death, a portal back to the Choosing entrance area will open and you can continue your journey.
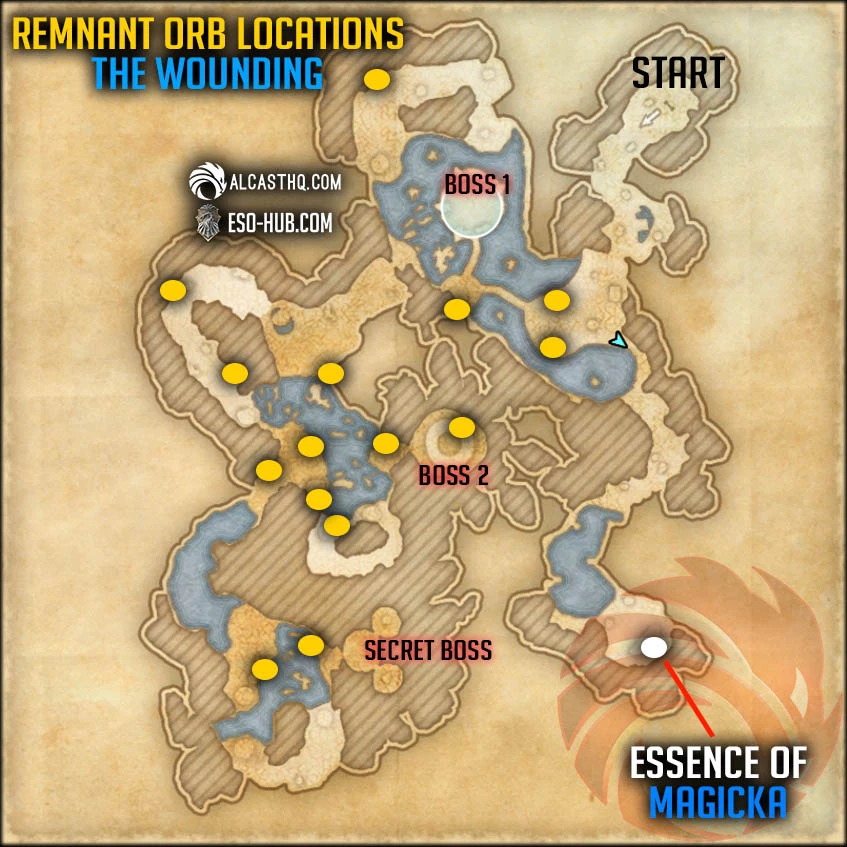
Essence & Remnant Map
In this picture you can find the Essence and the Remnant Orbs. To gain access to the essence you need to have cleared the green arena already because you need the grappling hook mechanic to get there.