QUICK TIPS:
Tank
- Taunt the boss looking away from the group, and block its attacks.
- Scroll down to the “Tank swap” mechanic - it is important you understand this well!
- If you’re using Qcell’s Dreadsail Reef Helper, tanks need to swap bosses when one tank gets a fragility.
- Once you gain Fire Fragility, any fire elemental damage will deal massively increased damage to you - avoid everything or you will die to 1-shots. The analogous goes for Ice Fragility.
Healer
- Focus healing on the tank especially after heavy attacks from the boss or atronachs, since they will have a healing absorption (the first 40k healing will be negated!)
- There are a lot of DoTs (damage over time) on the tank, if you see their health moving up and down, focus-heal them for a few seconds - typically they are short phases or no more than 10s.
DD
- Take the fire dome if you see ice enemies, and vice versa. Your raid-lead will call it.
- Stop damaging the boss when atronachs are alive - they are the first priority.
Detailed Guide:
The fight begins with only six Hounds, while the bosses Lylanar and Turlassil are sitting high up teasing and mocking you. There are three Flame Hounds and three Frost Hounds.
Although they can be killed directly, they take reduced damage (10% received damage) unless the correct domes are used. The dome mechanics are used through the boss fight and require more clarification:
Dome Mechanics
- There are two spheres, an ice one on the left and a fire one on the right, that can be activated by a player looking at them and interacting with them (press E).
- A player interacting with the ice sphere takes increasing damage from “Piercing Hailstone” and holds a dome centered on the player.
- A player interacting with the fire sphere takes increasing damage from “Destructive Ember” and holds a dome centered on the player.
- How to take, steal and drop the domes?
- Look at the corresponding sphere (ice or fire) on the side and press interact. If someone else is holding the dome, it will be stolen from the current carrier.
- You can interact with the same sphere again to drop your own dome 3s after picking it up.
- After you drop a dome (because you deposited it, or someone stole it from you), you can’t take it again for 15s (HM 20s).
- If two domes touch each other, they explode dealing damage to everyone in the area (Ember Overload/Hailstone Overload).
- In the whole fight, each enemy belongs to one element: Fire (Lylanar, Iron Atronach, Flame Hound) or Ice (Turlassil, Frost Atronach, Frost Hound). Those can be referred to as “red” for fire and “blue” for ice. (i.e. take blue atros).
- Enemies of an element take reduced damage unless they're inside a dome of the opposite element, and the person dealing damage to them also is inside. For example, you will want to keep fire enemies inside the ice dome.
- If the enemy is inside the correct dome but you are not, you will deal reduced damage to it.
- If you are inside the correct dome, but the enemy isn’t, you will deal reduced damage to it.
Strategy tip: Since the dome holder takes increased damage, it is recommended that you have several players taking turns on holding the correct dome. Be careful - taking the ice dome inside or too close to the fire dome (or vice versa) will result in a massive explosion and a likely group wipe. The fight consists of three phases:
- One boss fights alone
- The other boss fights alone
- Both bosses fight together
1 and 2 can happen in any order, as in the first can be either Lylanar or Turlassil, and the second one will be the other enemy.During all phases, Frost Hounds and Flame Hounds will be present which will deal small damage, but they will vomit (Flame Retch/Raw Chunder) in AoEs that deal medium elemental (fire or ice) damage. If not dealt with, they will eventually heal each other.
1 - First Phase
Fire and Ice phases can happen in any order. For example:
Lylanar (fire boss) comes down. The boss has a frontal cleave and the tank has to aim it away from the group. At different health thresholds, the boss will call to spawn atronachs:
Atronach Spawn
The boss will spawn atronachs as certain health percentages are reached. The atronachs will spawn on random corners of the room - and there will be an animation for a few seconds so the tanks are able to taunt them before they activate. atronach health: 4.3M / HM 5.6M
- 90% boss health: same color atronach spawns
- (HM only) 85%: wrong color atronach spawns
- 80%: same color atronach spawns
- (HM only) 75%: wrong color atronach spawns
At 65% health, the boss will start its teleport mechanics.Note: for the second phase, this threshold is slightly different, the second one jumps at 70%
Atronach mechanics
- After a few seconds alive, tornadoes of the matching element will start spinning centered around atronachs if they are not dealt with quickly
- Frozen Blockade
- Fiery Blockade
- Note this is elemental damage (fire or ice) and highly amplified by the fragilities.
- Atronachs’ light attacks apply Bleed - a 6s damage over time on any target they hit.
- Atronach’s heavy attacks act the same way as the bosses heavy attacks - applying one of several debuffs. See the section Heavy attack below.
2 - Second Phase
Fire and Ice Phase can happen in any order. In our example:Turlassil (ice boss) comes down alone. This phase is identical to the first phase, with reversed elements and colors.
One difference: the boss will begin its teleport mechanic at 70% health, rather than at 65% like in the first phase.
3 - Third phase - Lylanar AND Turlassil
Both bosses will be present, the first boss that has gone away is coming back at 65% HP.
- Lylanar has to stay in the ice dome
- Turlassil has to stay in the fire dome
- The domes can’t overlap.
- Split the bosses, so the domes do not overlap.
Hardmode: they will begin the Frigidarium and Charred Constriction mechanic (see picture below on how to handle it).
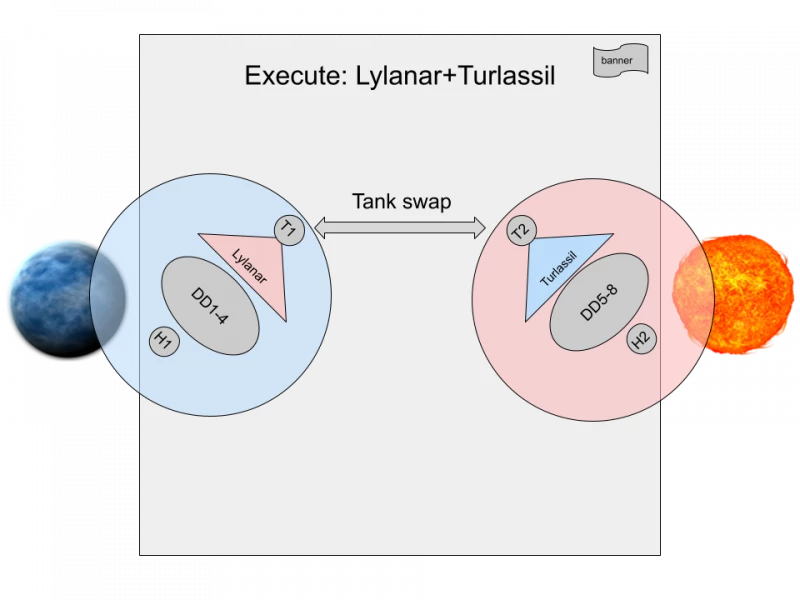
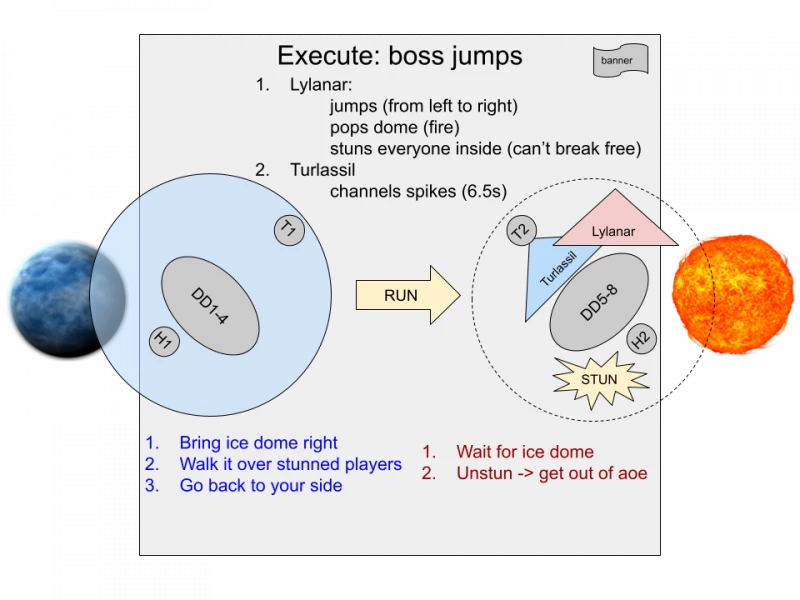
4 - Execute - Killing the Bosses
This is not a phase per se, but it is important to know that both bosses need to die at the same time - or it will end up in the whole group dying and having to restart.
After killing the first boss, you have 15s (7.5s in Hardmode) to kill the other boss before the domes that are being held are dispelled, and the spheres on the sides get deactivated. After that happens, the boss will try to do the jump mechanic that needs to be interrupted - except you won’t have a dome to interrupt it and everyone will die.
Boss Mechanics
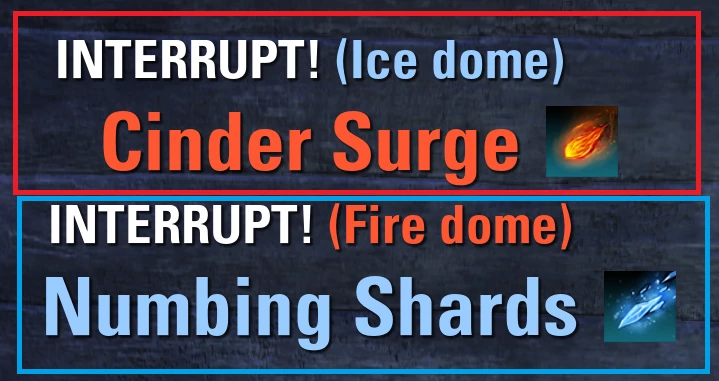
Interrupt (Numbing Shards / Cinder Surge)
The boss will periodically start channeling. If not interrupted, it will start throwing projectiles at all players. If interrupted, this mechanic is completely skipped. A boss can only be interrupted if the boss is inside a dome of opposite color (Lylanar in the ice dome and Turlassil in the fire dome).
- Lylanar (fire): Cinder Surge
- Turlassil (ice): Numbing Shards
Heavy attack (Stinging Shear / Broiling Hew)
Heavy attacks from the bosses, the atronachs or even the trash between bosses will apply several debuffs to the tank depending on the conditions:
- If the heavy attack is dodged:Seethe: Overwhelmed by anger from a missed attack. For 12 seconds damage done by the enemy increased by 60%.
- Seethe: Overwhelmed by anger from a missed attack. For 12 seconds damage done by the enemy increased by 60%.
- If the heavy attack is blocked (and not fully shielded):
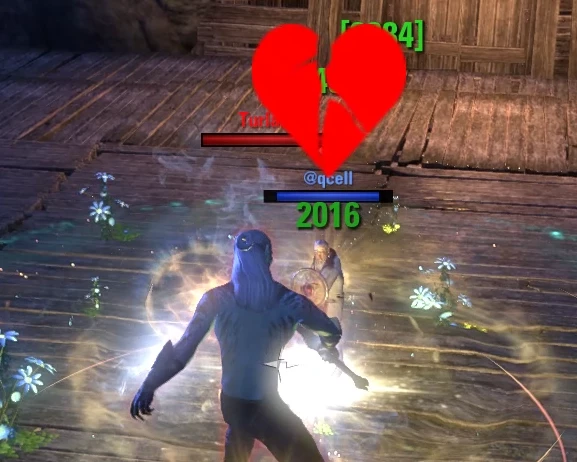
- Hindered: Healing your missing health is prevented for 12 seconds or until 39760 points of healing are received. (Trauma / Healing Absorption)
- Hindered is immune to skills that remove negative effects.
- Qcell’s Dreadsail Reef Helper (addon) will show healers a broken heart on top of the tanks, indicating the healing absorption needs to be outhealed.
- Rattled: You are shaken up for 12 seconds.
- Damage done decreased by 70%.
- Damage taken increased by 40%.
- Rattled is immune to skills that remove negative effects.
- If the heavy attack is not blocked or is fully shielded:
- Devitalized: You are weakened for 8 seconds.
- Physical Resistance and Spell Resistance decreased by 60%
- Damage taken increased by 30%
- Damage shields are decreased by 30%
- Devitalized is immune to skills that remove negative effects.
The skills are identical but named differently depending on the boss:
- Lylanar (fire): Blacken
- Turlassil (ice): Glaciate
Teleport (MultiLoc)

Jump positions from Qcell's Dreadsail Reef Helper AddonTank Swap (Fragility)
Mechanic name: Fragility (Imminent Chill + Chilling Fragility / Imminent Blister + Blistering Fragility), also known as Ice Fragility or Fire Fragility.
Lylanar will give the player holding aggro a 10s debuff called “Imminent Blister”. 10s after gaining Imminent Blister, the debuff will disappear and the player will instead get “Blistering Fragility” (also known as Fire Fragility) for 20s. During the first 10s, that player receives regular damage, but during the 20s of the fragility, fire damage will be massively increased - essentially any fire damage will be a one-shot.
Turlassil works the same way, with Imminent Chill and Chilling Fragility.
This mechanic is the tank-killer or group-killer that many referred to as the gate-keeper of the whole Dreadsail Reef trial. As soon as any of the tanks gets an imminent fragility, aggro needs to be swapped. That means:
- if there’s one boss: the other tank taunts it. The tank with fragility will need to be careful to not step in the corresponding elemental damage.
- if there are two bosses: tanks will need to do the famous “Tank Swap”, switching who is taunting which boss.
You have 10 seconds to do the swap, or a bit more if you notice the cast animation of the boss for the debuff early - do not rush the swap and make sure the team is leaving space for the tanks to coordinate.
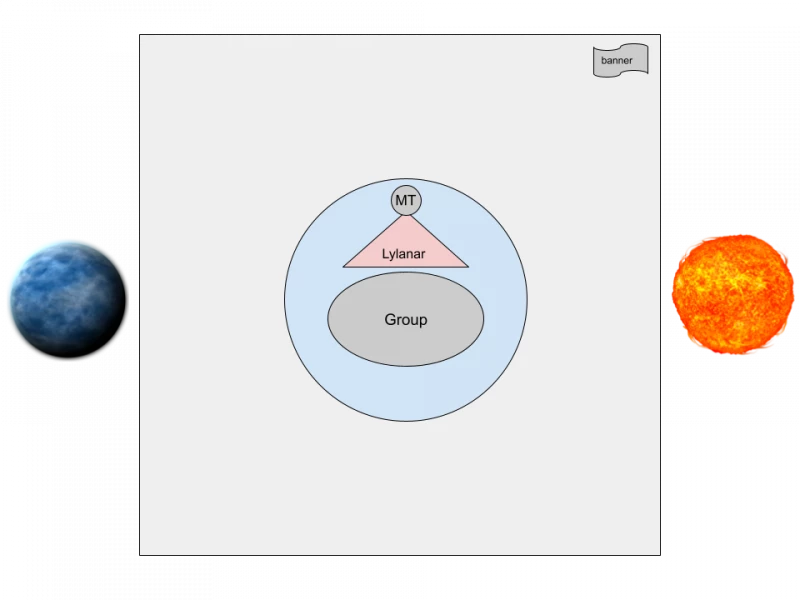
Lylanar + Turlassil: Initial Fight position
Rune Stacking (Firebrand/Frostbrand)During phase 3 when both bosses are present, players will need to deal with a stacking mechanic similar to Foreman Braddigan’s from Shipwright’s Regret or Siroria’s flare.
- One player will receive a firebrand and another player will receive a frostbrand - make sure to stack by the time they detonate or you will both die.
- The detonation needs to happen outside the domes, otherwise the player with the rune will explode everyone inside.
- Hardmode: Two players get Frostbrand, and two players get Firebrand. You need to stack in pairs, always ONE Firebrand with ONE Frostbrand together to cancel them out.
The skills are identical but named differently depending on the boss:
- Lylanar (fire): Firebrand
- Turlassil (ice): Frostbrand
Crisp Flurry / Pyretic Wake
After stacking with the brands, a line of fire or ice respectively is shot away (Crisp Flurry / Pyretic Wake) and will damage everyone in line. As you’re stacking for the runes, you can aim the line away from the group.
Hardmode
Hardmode Interrupts (MultiLoc)
It works the same way, but the player taking the dome gets Frigidarium / Charring constriction and can't bash. It's recommended to send players in pairs (one takes the dome, the other bashes) or have a player in the middle using a ranged interrupt skill such as Crushing Shock.

Hardmode execute jumps Frigidarium + Charring Constriction mechanics
Hardmode Execute Boss Jumps PositioningVideo
Boss 1 Lylanar & Turlassil Hardmode HM clear (live):