


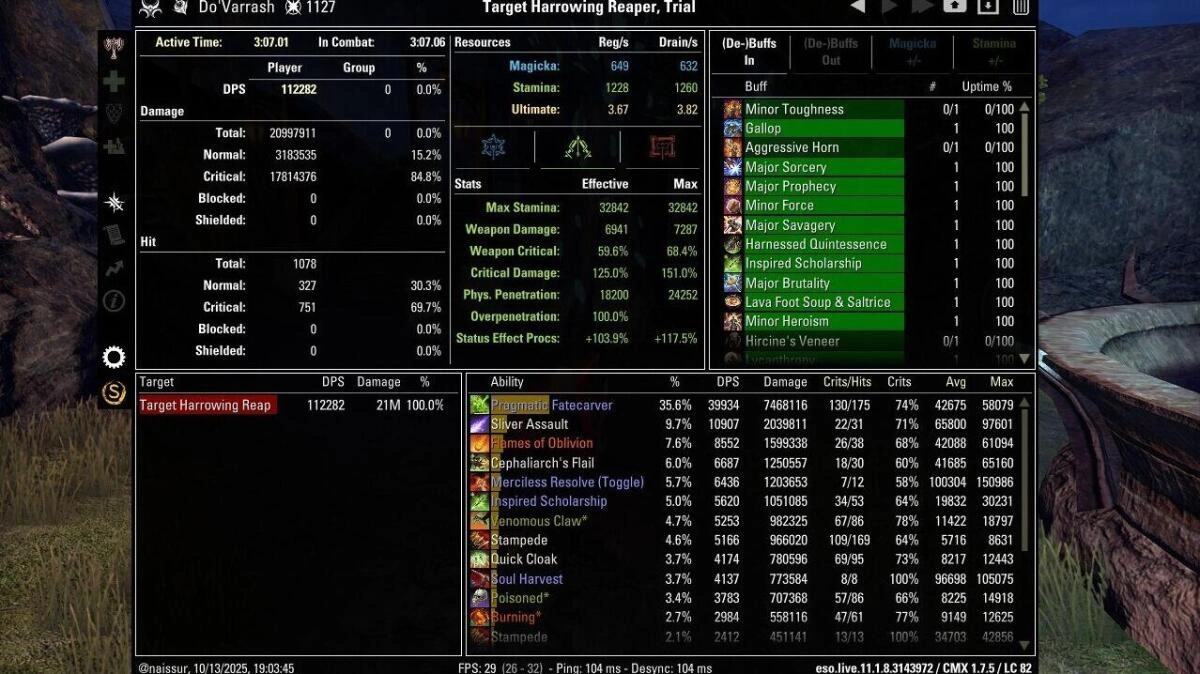
- 💥 Group DPS (110k+)
- ⚖️ Solo Endgame Setup (Hardmode, Archive, Difficult Bosses - 100K DPS)
- 🗡 Solo & Dungeon Setup (1-Bar Build - 80K DPS)
- 🔥 PvP Setup – Bloody Ninja & Brawler Modes
This is primarily a PvE build with extraordinary PvP flexibility. You can go full PvE DPS or sacrifice a bit for more survivability by splitting your stats 32 Stamina / 32 Health.
If you’re into ganking first, check my Magblade Ganker setup.
To make this build work, you need to install the Wizard's Wardrobe plugin, so you can quickly swap set ups without hitting the armory.
MAJOR UPDATE: Swapped Ardent Flame for Aedric Spear because of the increased PVP Flexibility, Damage and Survivability. PvE side doesn't seem to have lost anything. Got a 110k parse on first try.
💥 Group DPS (110k+)
In group content, this setup comfortably delivers 110k DPS, reaching 120k+ in optimized groups. With a few skill swaps (Lava Whip, Killer Blade, etc), it can scale beyond 140k, but its strength lies in how easy and consistent it is to use.
The rotation is intuitive, focusing on sustained multi-target damage and well-timed DoTs, without swapping builds or bars.
Rotation Tips:
- Keep the DOTS actives a at all times.
- Keep Inspired Scholarship active, Cast 2 flails then Pragmatic Fatecarver to deal a massive amount of DPS.
- Remember to weave to get 10 stacks of Merciless Resolve. Use the bow proc after casting Soul Harvest. If you get to 10 stacks and Soul Harvest is not ready, proc the bow once.
⚖️ Solo Endgame Setup (Hardmode, Archive, Difficult Bosses - 100K DPS)
For harder solo challenges, use the Solo Build.
Keep buffs active and burn enemies steadily.
Facing a single boss with no adds? Swap Caltrops for Elemental Weakness.
Need more DPS? Swap Exploiter for Reaving Blows.
Need to survive longer? Switch to the Extreme Survival variant for a 40k+ damage shield layered over your HP.
It turns tough world bosses or late Infinite Archive stages into a manageable fight.
Infinite Archive: Run this build (or 1 Bar Build) until the end of Arch 3. Then swap Camo Hunter for Revealing Flare for 10% damage mitigation, Merciless Resolve for Razor Caltrops, Elemental Susceptibility for Resolving Vigor and Venomous Claw for Flames of Oblivion (for crit buff)
🗡 Solo & Dungeon Setup (1-Bar Build - 80K DPS)
For normal and veteran solo content, random dungeons, and world bosses, run the One-Bar Build:
85k DPS on a trial dummy, 49k DPS on skeleton dummy. Generally speaking, the DPS goes around 50k–80k in solo content, up to 100k in group content.
Rotation:
Maintain Blade Cloak, Razor Caltrops, and Inspired Scholarship → Two Flails → Pragmatic Rune when you have 2 stacks (or need an emergency shield).
To boost DPS further, swap Caltrops for Blazing Spear or the Banner. If you need more healing, swap Quick Cloak for Resolving Vigor or use the 100k Solo Build.
🔥 PvP Setup – Bloody Ninja & Brawler Modes
This build offers two PvP playstyles in one setup:
1. Unstoppable Gladiator (Human Form)
Extremely mobile and deadly. Ideal for battlegrounds and open-world ganks. It is inspired by TheGameRoom's Unstuppable Warden Build.
Combo:
- Chilled Soul to breach the armor, deal damage, apply a DoT and proc the poison set DoT.
- Toppling Charge to close distance, stun the enemy and gain Major Protection.
- Spam Shattering Knife to deal damage to enemies, refresh a damage shield and heal yourself.
- Fire Fire Merciless Resolve when ready
- Use Healing Contingency to heal yourself, then Dodge Roll to trigger a strong self-heal.
Tip: Use Well-Fitted instead of Divines for better mobility and stamina sustain. - Cast Crescent Sweep whenever ready to deal damage and apply a strong DOT to enemies.
2. Werewolf Brawler
Transform when the fight drags on or you need tank-like sustain.
Rotation:
- Brutal Pounce to deal damage, apply poison dots and close the distance
- Defending Roar (apply fear, reduce 6k enemy armor, off-balance status)
- Re-cast Brutal Pounce within 5 seconds to apply a DoT
- Claws of Life (damage + DoT + heal)
- Spam Howl of Agony you have to re-apply a DoT
- Use Hircine’s Fortitude for emergency heals.
Expect to melt packs of enemies.
- If you need more defense: Take out the Unleashed Terror and Cuirass of the Trainee chest. Use a Magma Incarnate Head for sustain and complete your set up with Rallying Cry or Warrior-Poet.
- If you need more sustain: Use Wretched Vitality instead of Unleashed Terror.