UPDATE: Proc sets will be re-enabled on Ravenwatch for update 43, hence this build will be completely obsolete beyond that update. I'll leave this build up for archival purposes, but I would not recommend running it anymore.
After Templar, Warden is probably the class most people think of when discussing healers. While there are several classes with more healing potential than Warden, such as Sorcerer and Nightblade, Wardens still make for decent PVP healers. They are one of the better classes when it comes to buffs, and they can be pretty hard to kill even when not built in a tanky manner. The buffs provided by your Warden healer may already be granted by a Warden DD and/or a healer playing another class, so part of your value will depend on the group's composition. This build is the standard build I use for all healing classes on the no-proc Ravenwatch campaign. I do not recommend using this build outside of a no-proc environment.
I did not go for the usual ‘max HP Polar Wind spam’ meme as I do not think it's as effective in bigger groups, and in smaller groups you are probably just better off creating another Warden DD with Polar Wind in its arsenal.
IMPORTANT NOTES: Your mileage may vary depending on your selected race. My main Warden is a Redguard, which is not an ideal class for a healer, so feel free to add more spell damage glyphs to your jewelry if you play a sustain race like Breton. Also make sure your attributes are arranged in such a manner that you reach at least 30k hp with just your buff food (but WITHOUT the Minor Toughness buff.)
Sets:
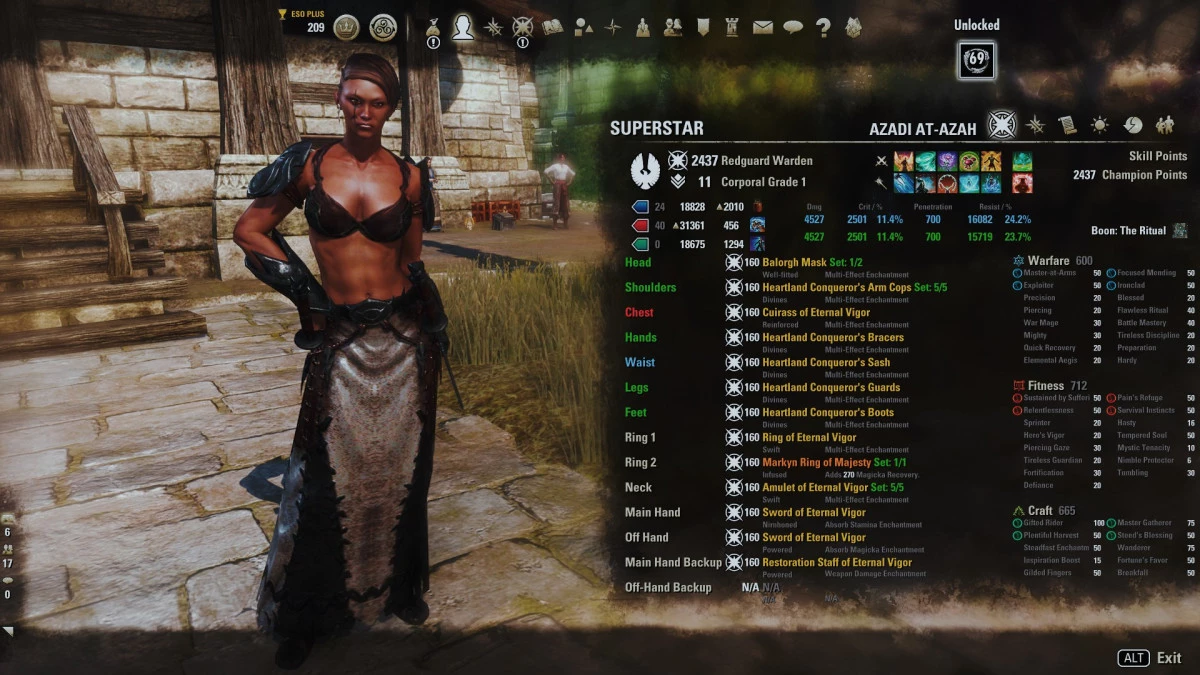
Eternal Vigor - The most effective sustain set that works on Ravenwatch. We don't have the Red CP tree to carry our sustain, so this set is going to do that instead. Use 1 Magicka Recovery glyph on your Infused jewelry piece if you are not playing Breton. If you play Breton, you can use 3 Increase Spell Harm glyphs. If you really struggle for sustain, you can add more recovery glyphs, but if you want to learn this playstyle well, I recommend trying to improve your rotation rather than relying on crutches such as over-sustain.
Heartland Conqueror - In combination with our traits, Heartland Conqueror gives us very high healing and spell/weapon damage (the latter of which boosts our healing further, since most healing skills scale off of it.) It is also a crafted set, which allows us to go for a set-up with 5 medium, 1 light and 1 heavy. Not only does this give us access to Shuffle, but it also gives us much more useful passives (speed, spell/weapon damage, better survivability) than light armor. The end result is that this set easily outperforms the pervasive Healer's Habit under any circumstance.
Ring of Markyn Majesty - We don't have many options for mythics in Ravenwatch, so as with a lot of no-proc builds, Markyn gives the best bang for buck. You could use Torc of Tonal Constancy or Wild Hunt instead, but I do not feel like either are needed.
Symphony of Blades - We use the 1-piece of this monster set to get a little more extra healing done just because we can. You can also use sets like Earthgore or Troll King, which give the same effect. Or even something like Trainee if you want extra health.
For armor traits I use 1x Reinforced + a mixture of Divines, Well-Fitted and Impenetrable. Run whichever ones you are comfortable with. Sturdy is fine too.
Skills:
Warden has a pretty varied class kit for healers, making this one of the more unique classes to play. Our main burst heal will be Enchanted Growth. Slotting it on our dual wield bar allows us to reach healing ticks similar to Blessing of Restoration. You can use that skill instead if you so please, but I think Enchanted Growth is more fun to use and more useful due to it also giving minor recoveries to allies hit.
Deceptive Predator is your snare removal, which also grants Major Expedition and Minor Evasion. You may slot Shuffle instead to gain access to Major Evasion, but I personally like having the speed boost granted by this class skill.
Budding Seeds is an aoe heal with a valuable synergy that may be used by your allies to trigger an additional, more powerful heal-over-time effect.
Blue Betty is there to give you your own source of Major Brutality/Sorcery as well as some extra magicka return. Activating Lotus Blossom, meanwhile, gives you access to Major Prophecy on both bars over its 1-minute duration.
Polar Wind is your flex spot. You can use this powerful burst heal when your group is under heavy pressure, or you are separated from your group and kiting a bunch of enemies. Alternatives for this spot are the usual stuff like Energy Orb and Overflowing Altar. You could also put Elude here so you have access to both Minor and Major Evasion.
General skills include the usual: Echoing Vigor and Radiating Regeneration, which you should keep up at all times, and Healing Springs for static AOE healing and a magicka recovery boost. Simple stuff.
Our ultimates are as follows: Replenishing Barrier as our general ‘oh shit’ button for when things go south. It also passively grants us more magicka recovery on the bar it's slotted. The other ultimate is Healing Thicket, a Warden class ulti that also falls under the ‘oh shit’ category, and while not as impactful as Barrier, is one of the cheapest ultimates available at a base cost of 80. You can decide for yourself on which bar you want to slot each ultimate. You could slot Barrier on your burst heal bar to gain more magicka recovery there, or you could slot Healing Thicket on your burst heal bar for more healing done through the Warden class passives.
Consumables
Buff food: Orzorga's Red Frothgar gives us amazing magicka recovery and boosts our health a lot. We don't need the extra stamina recovery of Jewels/Bear Haunch because we are based.
Consumables: Your potion use will depend a lot on whether or not your group has a Dragonknight in it to give you Major Brutality/Sorcery. If not, or if they have dodgy uptimes, use Alliance Spell Power potions as your basis. Use Tri-Stat Potions when your stamina pool is taken too much pressure as the Major Endurance it grants should pull you through. In more GvG-type situations or before big pushes, use Immovability Potions (with magicka + health) to make sure you can set your skills off in those vital moments.
Mundus
The Ritual is the only mundus you should consider as a group healer.
Curses
We play as a mortal. The extra tankiness of Vampirism 3 is not needed and will only hurt our sustain. With this build you are likely to be the last one alive in 9 out of 10 groups so there is no point in coating yourself in 7 Heavy holding block on your S&B bar while your Vigor ticks crit for sub 1k.
Other stuff
As with any group healer build, good positioning is key to your survival. Use your DDs as your buffer as you cast heals into them and do not stand in the middle of an enemy damage point (or even in your own group's damage point for that matter, as that is the most likely spot for a counter-attack.) If possible, use logs to track how much damage you take compared to your DDs. If you are at or near the top of the ‘Damage Taken’ tab, take a critical look at your positioning: you need to be near or at the bottom relative to your DD group members. The only exception is if you are smallscaling (like proper smallscaling, not 10 bozos doing poorly timed ulti dumps), as you will likely be targeted a bit more.
Be sure to light attack inbetween any cast on your backbar for optimal sustain and berserker glyph uptime. If all of your skills are ticking and you are not under direct pressure, use a heavy Resto attack to get back magicka and proc Major Mending.
Mind that you can run the exact same gear on any other class and be as effective a healer as that class permits you to be. However, you might need to adjust some traits and other things based on what the class does/doesn't offer.
General questions a lot of healers seem to have:
Is Vampirism always needed on PVP healers? No. In Ravenwatch you will die most often because you ran out of resources. Vampirism 3 hurts your sustain, so only use it in smallscales where you just can't ignore that damage mitigation.
Why run 5 medium? Because it gives us the best healing numbers, most useful Armor passives + access to Shuffle. I've both played against more traditional set-ups and experimented with them myself, and none of those builds can keep up with this one on just about any level.
Why dual wield? A dual wield sword frontbar gives us bigger ticks on any heals that are activated on that bar, which includes our most important skill: Echoing Vigor. You can play this build with 2 Restoration Staves, but it would simply not be as good.
Don't I need more mitigation? I heard that healers get focused a lot. Healers who say they get focused are 90% of the time just trying to explain away the fact that their positioning was off or they made some other kind of mistake. Before you add more mitigation, record your own gameplay so you can see later if there was anything you could've done to prevent death with your current set-up. Nearly all groups on Ravenwatch will focus on the biggest stack of enemy players instead of a singling out the healer.
What about magicka cost reduction sets? Especially since hybridization, sets like Seducer and Eyes of Mara are not optimal (read: garbage) because they fail to cover a pretty significant amount of your skills. Eternal Vigor is all you need for sustain on Ravenwatch.
Is Gossamer a bad set for proc healing? Yes, and if you disagree please show me a screenshot of a player gaining over 80% Major Evasion uptime solely through Gossamer.
As always, if you have any questions about this build, feel free to message me through Youtube or in-game. My name is degonyte in both places.