UPDATE: Proc sets will be re-enabled on Ravenwatch for update 43, hence this build will be completely obsolete beyond that update. I'll leave this build up for archival purposes, but I would not recommend running it anymore.
Sorcerer is currently the strongest option for raw healing on the Ravenwatch server, full stop. It sports strong (almost) passive healing through Power Surge; it is stat-dense due to Bound Aegis, and it has unmatched mobility even without any Swift jewelry or Wild Hunt, making positioning a piece of cake. Wardens and Templars could only dream of doing this amount of healing while also keeping out of harm's way.
The base healing build (the Casual and Ballgroup set-ups) is suited for all types of no-proc PVP on the Ravenwatch server, as long as you have a group size of 7 or more. In smallscales, you typically need to take some measures to boost your individual survivability, so I have included a separate Smallscale set-up (scroll down for separate information on that particular set-up). Make no mistake: for anything from zergs to high-end ballgroups, this is the build to run. In the past I have played the more classic no-CP builds that include sets like Healer's Habit, Pariah, Seducer and Crafty Alfiq, and all of them underperform compared to this. If you play it correctly, no one will be able to outheal you, not even when they spam useless Barriers to cheese the logs.
Now, a little explanation regarding the sets:
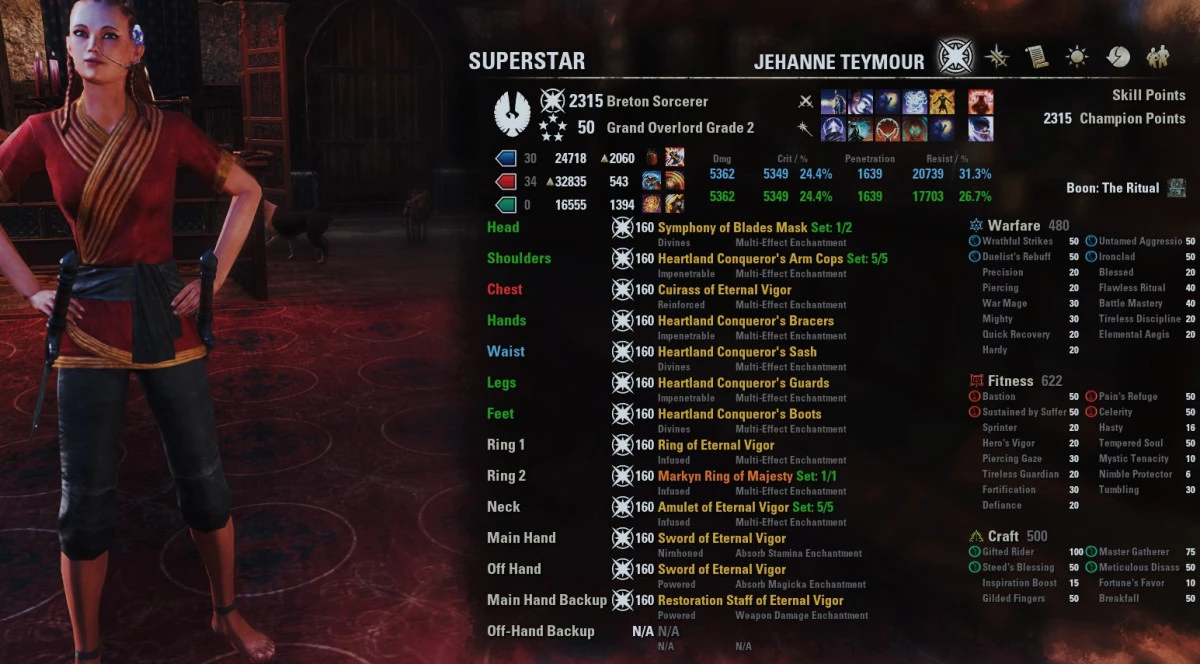
Eternal Vigor - The most effective sustain set that works on Ravenwatch. We don't have the Red CP tree to carry our sustain, so this set is going to do that instead. If you play Breton, you will not need any recovery glyphs on your jewelry. If you don't, just 1 magicka recovery glyph is enough.
Heartland Conqueror - In combination with our traits, Heartland Conqueror gives us very high healing and spell/weapon damage (the latter of which boosts our healing further, since most healing skills scale off of it.) It is also a crafted set, which allows us to go for a set-up with 5 medium, 1 light and 1 heavy. Not only does this give us access to Shuffle when we need it (more on that in a bit), but it also gives us much more useful passives (speed, spell/weapon damage, better survivability) than light armor. The end result is that this set easily outperforms the pervasive Healer's Habit under any circumstance.
Ring of Markyn Majesty - We don't have many options for mythics in Ravenwatch, so as with a lot of no-proc builds, Markyn gives the best bang for buck. You could use Torc of Tonal Constancy or Wild Hunt instead, but I do not feel like either are needed.
Symphony of Blades - We use the 1-piece of this monster set to get a little more extra healing done just because we can. You can also use sets like Earthgore or Troll King, which give the same effect. Or even something like Trainee if you want extra health.
Skills:
My build video can explain this in more detail, but basically the idea is as follows: keep Echoing Vigor, Radiating Regeneration and Healing Springs up at all times. You will usually have enough sustain to basically spam any of these skills to your heart's content. Use Blessing of Restoration as your burst heal, and also to grant Minor Resolve to your best friends. Use Ball of Lightning to reposition yourself but remain aware of the ramping magicka cost of this skill.
Inner Light and Bound Aegis are just there for their passive benefits so you typically won't touch them.
Now, the next skill depends a bit on your group composition. In a ballgroup or any group that is otherwise decently organized, you will likely have a Warden granting you Major Resolve through Expansive Cloak, and if you're lucky a speedbot casting Rapid Maneuver. If this is the case, you use Shuffle as your snare removal and Major Evasion source. Keep it up at all times during combat and recast it right before a push to activate its snare immunity. If you are not in an organized group, you use Hurricane to gain access to Major Resolve and Minor Expedition. This means you won't have a snare removal but you can simply use Bolt Escape if you get stuck. If you really miss your snare removal, add Shuffle or Race Against Time instead of your frontbar Inner Light slot.
Finally, your go-to ulti will be Absorption Field (Negate morph), which you can drop on top of where your group pushes. A well-timed Negate will counter most of the healing of your enemies while also healing your own team mates. Since Necrom, Negates can cancel each other out again, regardless of the morph. This means that if you drop your Negate on top of an enemy Negate, the latter will disappear. This can be a very effective tactic against (other) ballgroups, as you simply wait for them to push into their chokepoint or killzone and place a Negate, while you hang back and drop your Negate on top of theirs as soon as possible. Lesser skilled groups will probably not realize this in time and accrue a huge amount of damage before they escape.
If your group is under a lot of pressure constantly and struggles for survival all the time, you might favor the Replenishing Barrier ultimate to give your mates a cushion for their survival. Even if you don't end up using that ultimate, it's still useful to slot as it will boost your magicka recovery on that bar through the Support skill line.
Consumables
Buff food: Orzorga's Red Frothgar gives us amazing magicka recovery and boosts our health a lot. We don't need the extra stamina recovery of Jewels/Bear Haunch.
Consumables: Use Tri-Stat Potions for prolonged, zergy battles where your stam pool will likely be under pressure from random bozos spamming bombard and other CC skills. In more GvG-type situations or before big pushes, use Immovability Potions (with magicka + health) to make sure you can set your skills off in those vital moments.
Mundus
The Ritual is the only mundus you should consider as a group healer.
Curses
We play as a mortal. The extra tankiness of Vampirism 3 is not needed and will only hurt our sustain. With this build you are likely to be the last one alive in 9 out of 10 groups so there is no point in trying to become some 35k resist abomination with Undeath and S&B backbar.
Smallscale Healer
The third set-up included in this build guide is the Smallscale one. This build is largely the same as the others, but with more tankiness and sustain since we will be under constant pressure. This is the build I would run in any group of 6 or fewer. The sets are the same, with some changes. Instead of running a monster set 1-piece like Symphony of Blades, we use a heavy piece of Trainee in order to beef up our health pool. We also use a heavy leg piece, resulting in a set-up consisting of 3 heavy, 3 medium and 1 light. The traits are simple: Reinforced on the heavy pieces and Well-Fitted on the medium/light pieces. On the jewelry, we use 3x Swift trait as this gives you a significant advantage over zergs trying to roll you down. Positioning is even easier than before. I contemplated putting an Ice Staff on my frontbar, but I eventually went back to Dual Wield, because the higher hot ticks and heals really make a huge difference when you need to get your squad out of a dire situation. I've seen my Blessing of Restoration crit for 10-13k, so enough to get someone out of execute. Even the regular casts range from about 6400-8k per player.
In terms of skills, we also need to adjust some things to make ourselves more suited for smallscaling. First off, in a small group with already limited utility, we don't have the luxury of running Inner Light on both bars, so we're gonna drop those and rely on Major Prophecy / Immovability / Magicka potions instead. So what will we do with the free slots? For starters, we'll add our cheat sheet for this build: Dark Deal. Make sure you get the correct morph that gives you stamina in exchange for magicka. Getting magicka is easy on any healer build: 2 heavy attacks with your resto staff and you're done. Getting stamina is more tricky though, and running out of stamina is extremely dangerous, especially in a group where you might well be the only full healer. So with Dark Deal, we now have a reliable source of stamina (and some extra self-healing). All you need to do is be disciplined with your resto heavy attacks and you won't run out of resources until you're the last one standing.
On our backbar, we are slotting Overflowing Altar. The one weakness of Sorc healers (and every other class except Templars) is that you will have to aim your burst heals due to the conal cast of Blessing of Restoration (or Enchanted Growth in the case of Wardens). Walking backwards casting is not always an option when you are under heavy pressure, so that is when you use Bolt Escape to get ahead of the group and drop an Altar. The synergy of this morph gives the player a pretty insane heal when activated. Whenever someone in my group runs Altar and is good with the placement, I have several instances every run where the Altar alone allows me to survive an almost certain death.
Another skill we need to adjust is Shuffle, simply because we cannot run it with only 3 medium pieces. Instead of Shuffle, we are going to run Race Against Time. This means we won't have access to Major Evasion, so be careful with that siege damage. Still, having a snare removal is more important, since you will be snared pretty much constantly when you are smallscaling, and not having a snare removal will hit our stamina pool too hard to be viable. If you're feeling adamant about Major Evasion, you can always slot Quick Cloak on your frontbar, but I personally don't have the barspace for it.
Some secondary aspects of the build have also changed. We now run Vampirism Stage 3. With a higher health pool and much more prolonged pressure, the strong anti-execute of the Undeath passive allows us to still wear healing-oriented sets without having to resort to Pariah or other tank sets. Attributes have been reshuffled a bit since we're now wearing Trainee and 3 heavy pieces. With the Argonian healer I use for this particular spec, I land at 38k health with Minor Toughness active, and around 23k magicka. This is more than enough to get our job done. The food remains the same, and as said, we'll run Immovability potions that also grant Major Prophecy, in order to make up for the lack of Inner Light.
Other stuff
As with any group healer build, good positioning is key to your survival. Use your DDs as your buffer as you cast heals into them and do not stand in the middle of an enemy damage point (or even in your own group's damage point for that matter, as that is the most likely spot for a counter-attack.) If possible, use logs to track how much damage you take compared to your DDs. If you are at or near the top of the ‘Damage Taken’ tab, take a critical look at your positioning: you need to be near or at the bottom relative to your DD group members.
Be sure to light attack inbetween any cast on your backbar for optimal sustain and berserker glyph uptime. If all of your skills are ticking and you are not under direct pressure, use a heavy Resto attack to get back magicka and proc Major Mending.
Mind that you can run the exact same gear on any other class and be as effective a healer as that class permits you to be. However, I would highly suggest running 2 pieces of Swift jewelry on any other class to compensate for the lack of Ball of Lightning.
If you have any questions about this build, feel free to message me through Youtube or in-game. My name is degonyte in both places.