


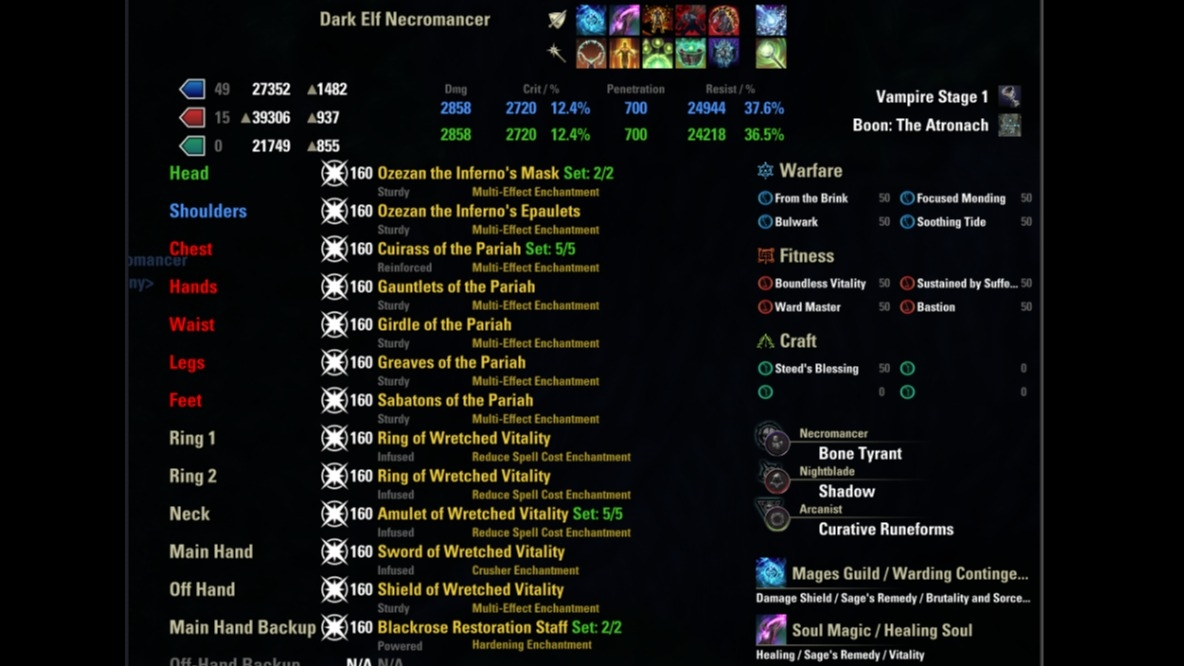
STATS:
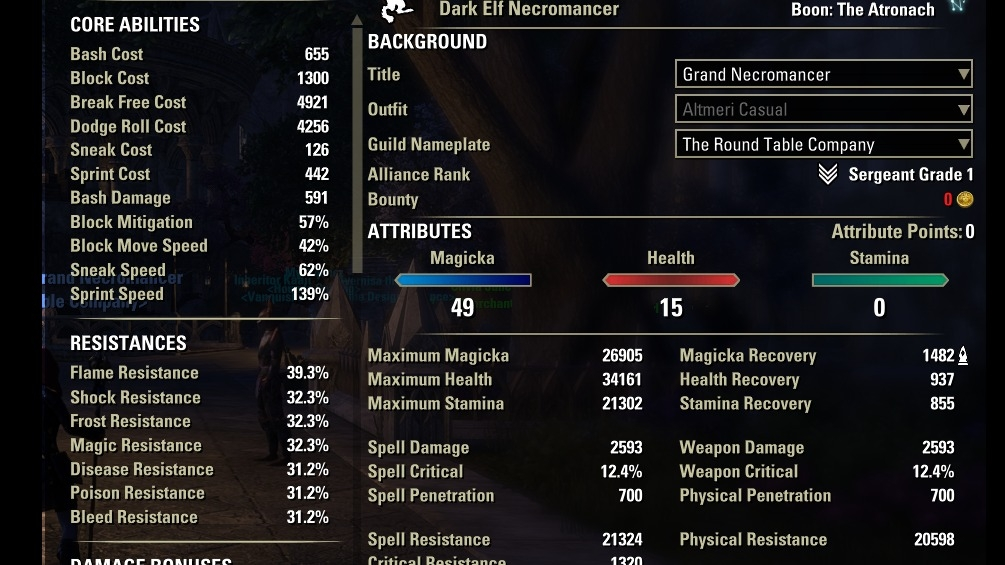
This build should be at roughly 40k Health and as close to 30k Magicka as you can make it. I currently use 49 Attribute points in Magicka and 15 points in Health. The 40k Health is really important to help survive burst damage.
Sturdy on most of your gear is to help you block incoming damage longer, you'll need every bit of help you can get just to stay alive sometimes. This is especially helpful when using ![]() Dark Cloak since this skill is very helpful when you are being focused. Remember, a dead healer can't heal!
Dark Cloak since this skill is very helpful when you are being focused. Remember, a dead healer can't heal!
Reduce Spell Cost Enchantments on the jewelry also help to manage your resources, Infused traits to make them stronger.
The Mundus stone is The Atronach to help increase your magicka recovery further in addition to ![]() Wretched Vitality. In previous iterations of this build, it was difficult to manage the magicka expenditure when casting, but with the adjustments the recovery has improved ten-fold.
Wretched Vitality. In previous iterations of this build, it was difficult to manage the magicka expenditure when casting, but with the adjustments the recovery has improved ten-fold.
GEAR:
![]() Mark of the Pariah - This set makes you much harder to kill, making you tougher as you lose health. It is important for a healer to be tanky in PVP, so Pariah's being Heavy Armor in addition to its set bonuses is fantastic.
Mark of the Pariah - This set makes you much harder to kill, making you tougher as you lose health. It is important for a healer to be tanky in PVP, so Pariah's being Heavy Armor in addition to its set bonuses is fantastic.
![]() Wretched Vitality - It's very easy to run out of Magicka while healing, but due to all of the major and minor buffs that this set-up can grant, this set really helps manage your resources.
Wretched Vitality - It's very easy to run out of Magicka while healing, but due to all of the major and minor buffs that this set-up can grant, this set really helps manage your resources.
![]() Mender's Ward - This staff's effect is one of our two sources of Major Vitality. lt's ability only affects the individual who your
Mender's Ward - This staff's effect is one of our two sources of Major Vitality. lt's ability only affects the individual who your ![]() Ward Ally is granted to, but the increase to damage shields is needed due to Battle Spirit.
Ward Ally is granted to, but the increase to damage shields is needed due to Battle Spirit.
![]() Ozezan the Inferno - This is majorly for the Minor Vitality buff granted to allies, also really helpful to boost your weakened damage shields due to Battle Spirit.
Ozezan the Inferno - This is majorly for the Minor Vitality buff granted to allies, also really helpful to boost your weakened damage shields due to Battle Spirit.
-------------------
SKILLS:
FRONT BAR
[Warding Contingency] - Damage shield, HoT effect, and your source of Major Sorcery for more Spell Damage. Make sure you are near allies when casting, the delayed burst is an AOE around you.
[Healing Soul] - Large heal, HoT effect, and your second source of Major Vitality. The major buff only affects the ally targeted by the heal, but it goes a long way to help offset the Battle Spirit effect in pvp.
![]() Refreshing Path - The speed boost here is great, but this skill alone gives multiple minor buffs to allies which is good with the
Refreshing Path - The speed boost here is great, but this skill alone gives multiple minor buffs to allies which is good with the ![]() Wretched Vitality gear. Also the HoT it grants is useful in combination with [Regenerating Rejuvenation] to help your upkeep on the [Ozezan's Inferno] Minor Vitality buff.
Wretched Vitality gear. Also the HoT it grants is useful in combination with [Regenerating Rejuvenation] to help your upkeep on the [Ozezan's Inferno] Minor Vitality buff.
![]() Dark Cloak - Your primary survival skill, use this on cool down when you are dying, and don't forget to block! The passive Minor Protection it grants only you is also nice.
Dark Cloak - Your primary survival skill, use this on cool down when you are dying, and don't forget to block! The passive Minor Protection it grants only you is also nice.
![]() Phantasmal Escape - This is your snare immunity skill, but it also helps your survivability due to Major Evasion and potentially makes your next roll dodge cheaper.
Phantasmal Escape - This is your snare immunity skill, but it also helps your survivability due to Major Evasion and potentially makes your next roll dodge cheaper.
ULTIMATE
![]() Ice Comet - Mainly used for the knockdown, stun, and 50% decrease in movement speed to help to crowd control groups of enemies. The damage is negligible, but the CC can turn the tide of a fight. Even so, it's likely that you'll be saving your ultimate for
Ice Comet - Mainly used for the knockdown, stun, and 50% decrease in movement speed to help to crowd control groups of enemies. The damage is negligible, but the CC can turn the tide of a fight. Even so, it's likely that you'll be saving your ultimate for ![]() Life Giver since that's your main healing ultimate.
Life Giver since that's your main healing ultimate.
BACK BAR
![]() Radiating Regeneration - A 'sticky HoT' that stays ticking on an ally as you move around the map and even potentially out of range of a player. This is helpful in addition to
Radiating Regeneration - A 'sticky HoT' that stays ticking on an ally as you move around the map and even potentially out of range of a player. This is helpful in addition to ![]() Refreshing Path in keeping up a variety of HoTs, to keep up the
Refreshing Path in keeping up a variety of HoTs, to keep up the ![]() Ozezan the Inferno Minor Vitality buff.
Ozezan the Inferno Minor Vitality buff.
![]() Ward Ally - A large burst shield that affects the lowest health ally and yourself at the same time. This skill procs your
Ward Ally - A large burst shield that affects the lowest health ally and yourself at the same time. This skill procs your ![]() Mender's Ward staff effect to grant yourself and the target Major Vitality.
Mender's Ward staff effect to grant yourself and the target Major Vitality.
![]() Chakram of Destiny - The main spammable Damage Shield that gets stronger if you can stack them. Each activation generates a crux, and for each crux you have you increases your healing by 4% because of
Chakram of Destiny - The main spammable Damage Shield that gets stronger if you can stack them. Each activation generates a crux, and for each crux you have you increases your healing by 4% because of ![]() Healing Tides. Try to keep three crux up at all times.
Healing Tides. Try to keep three crux up at all times.
![]() Overflowing Altar - Grants Minor Lifesteal to allies within a radius of 28 meters. Allowing your allies to passively heal themselves while you are focusing on other things is a big help, even if the healing isn't particularly large. The synergy however, can be a real lifesaver as long as your allies remember to use it.
Overflowing Altar - Grants Minor Lifesteal to allies within a radius of 28 meters. Allowing your allies to passively heal themselves while you are focusing on other things is a big help, even if the healing isn't particularly large. The synergy however, can be a real lifesaver as long as your allies remember to use it.
![]() Remote Totem - This is your main crowd control skill, it fears enemies within while reducing how much damage they can do. It also grants Minor Protection to allies standing inside. It's important to use this morph so that you can cast this skill at a distance, you won't have to compromise your positioning as often this way.
Remote Totem - This is your main crowd control skill, it fears enemies within while reducing how much damage they can do. It also grants Minor Protection to allies standing inside. It's important to use this morph so that you can cast this skill at a distance, you won't have to compromise your positioning as often this way.
ULTIMATE
![]() Life Giver - Your main and most powerful healing skill, this ability casts three skills at the same time for free! (That is,
Life Giver - Your main and most powerful healing skill, this ability casts three skills at the same time for free! (That is, ![]() Radiating Regeneration,
Radiating Regeneration, ![]() Combat Prayer, and
Combat Prayer, and ![]() Ward Ally. Be sure to learn and morph
Ward Ally. Be sure to learn and morph ![]() Blessing of Protection despite not using it in the build so this ultimate can use its morphed ability.) Since this ultimate casts
Blessing of Protection despite not using it in the build so this ultimate can use its morphed ability.) Since this ultimate casts ![]() Ward Ally, it also will proc the
Ward Ally, it also will proc the ![]() Mender's Ward to grant Major Vitality to the target. This skill never fails to save someone from peril if used in time.
Mender's Ward to grant Major Vitality to the target. This skill never fails to save someone from peril if used in time.
-------------------
Additional Comments:
Consumables
![]() Bewitched Sugar Skulls are my current go-to for the stat increases, though
Bewitched Sugar Skulls are my current go-to for the stat increases, though ![]() Witchmother's Potent Brew is also decent if you are still finding you need more magicka recovery despite the smaller increase to stats. As previously mentioned, it's important to get to roughly 40k health for max survivability.
Witchmother's Potent Brew is also decent if you are still finding you need more magicka recovery despite the smaller increase to stats. As previously mentioned, it's important to get to roughly 40k health for max survivability.
[Essence of Immovability] doesn't restore any magicka but the stamina and the Major Endurance it grants is invaluable when you are being teamed up on. The biggest reason to use this potion, however, is because of the Unstoppable that is grants, immunity to knockback and disabling effects. If you see enemies approaching, it is helpful to use a potion just as they are about to arrive to nullify any initial debuffs they would place on you while you are focusing on your allies. This can be followed up with ![]() Phantasmal Escape to prevent snares and immobilizations while you are repositioning.
Phantasmal Escape to prevent snares and immobilizations while you are repositioning.
Passive Honorable Mentions
![]() Shadow Barrier will proc when you use
Shadow Barrier will proc when you use ![]() Dark Cloak and
Dark Cloak and ![]() Phantasmal Escape and does alot of work. This is your source of Major Resolve for a total of 22 seconds because of your five pieces of heavy armor.
Phantasmal Escape and does alot of work. This is your source of Major Resolve for a total of 22 seconds because of your five pieces of heavy armor.
![]() Healing Tides pairs with
Healing Tides pairs with ![]() Chakram of Destiny to increase your total healing by 12% as long as you have three crux active.
Chakram of Destiny to increase your total healing by 12% as long as you have three crux active.
![]() Intricate Runeforms is an amazing passive that will increase the strength of your damage shields and reduce the cost. This works on your backbar when casting
Intricate Runeforms is an amazing passive that will increase the strength of your damage shields and reduce the cost. This works on your backbar when casting ![]() Chakram of Destiny and
Chakram of Destiny and ![]() Ward Ally.
Ward Ally.